made X modern

DIY

Replacing Floors Asbestos We Can

DIYCatharine KlepacComment

Well if you follow me on Instagram, you have probably seen a few little hints of our new kitchen floors. And if you don’t well then you’re missing out on a lot of photos of baby Geoffrey. So. Your loss. Okay let’s rewind to a week before we moved in and decided to pull up the (oh so beautiful) carpet in the utility room.

I mean. It had to go. This photo isn't even edited. It's au naturel. 

We were hoping to uncover some original wood floors that just needed a bit of love, but sadly we uncovered this mess.

Womp womp. It turned out it was a vinyl that was probably added in the 70s, so we peeled up a bit of the linoleum in the kitchen and guess what? More vinyl. It’s hard to tell, but if you look closely you will see that this is actually a fancy gold glitter vinyl. SO fancy.

The problem with this fancy pants vinyl, was that it had been laid with asbestos mastic. I mean. We just can’t get away from this stuff.

We knew we wanted to replace the floors in the kitchen down the road, but we also knew that if we were doing the utility room, we’d have to do the kitchen at the same time so it would all look consistent. After doing a lot of research we learned that the safest option was to just lay new flooring over it. Scraping it up is virtually impossible, it will never be level, who knows what we would have uncovered, and it is super dangerous to breathe. We only had a week before we moved in and we needed to address the situation ASAP considering we didn’t want to walk on this vinyl let alone let Geoffrey walk on it. So we had to act fast. Normally this is the type of project we would have tackled ourselves, but because we were still in the middle of refinishing our floors, still had some packing to do, and had to move at the end of the week, we were clearly running out of time. So we made the executive decision to call in the pros.

Since hardwood wasn’t an option, I knew that I definitely wanted to go in with tile. And because I’m absolutely smitten with our original bathroom floors, I wanted to have a charming porcelain hex in the kitchen and utility room as well.

I contacted my Daltile Rep to see how quickly I could get 130sf of this tile (in 2" hex), and she said she could have it shipped from Dallas and ready to pick up in 2 days. Sold. I struggled with the grout color a bit, and ended up going with Dove Gray (on the left) so that it wasn’t so contrast-y (that’s an industry term).

Our tile contractor laid sheets of HardieBacker board to cover the vinyl mess and allow for the tile to be nice and level.

They applied the mortar onto the HardiBacker and laid out each sheet of hexagons, letting the mortar set for 24 hours.

Then they applied the grout and let it set over the weekend before sealing it.

Yes, I know that the grout looks really thick around the edges, but that is because the tile was left uncut around the perimeter of the room since we knew we'd be going back in with a more substantial base board and shoe moulding, which would end up covering it anyway. So we saved a few dollars there. 

Geoffrey was very upset that he couldn’t walk on it yet.

And now for the truth: I ended up making the mistake of approving the installation before I was able to walk on it (while the sealer was still drying). The next day we ended up finding a lot of issues with some residual grout that wasn’t cleaned properly before the sealer was applied (which you can see the inconsistencies in the photos below).

If you aren't familiar with the process, once the sealer is applied it is to be immediately wiped away so that it only soaks into the grout and not the surface of the tile (per the sealer instructions). That was not done in our case. The sealer dried to the face of the tile and has permanently ruined the surface and cleanability of the tile. Also, anything left on the face of the tile is now trapped under the sealer. So grout haze, dirt, dust, etc. are now permanent. I even had my Rep come and look at it, and she was absolutely shocked at the improper installation. She gave me some tips and chemicals to use to fix it as much as possible.

So now Derek and I are going to have to strip the sealer, clean the tile, and then reseal it ourselves, which basically means we'll be on the floor with tiny toothbrushes scrubbing the floor until the water runs clear again. We haven't done it yet because let's face it, we'd need a long weekend and will lose the use of our kitchen and laundry room (and have to move some major appliances), so it's been a bit of a back burner item.

It was a very expensive mistake, and I have been dreading sharing this (not so glamorous) detail with you guys. But hey. You live and learn right? I don’t like sharing not so great projects, but I wanted to be honest and up front with why I haven’t shared our floors with you yet, or really anything for a couple of weeks. I have just been really upset with myself over the whole situation, but I’m moving on. The utility room is really the worst part, but I can’t show you the kitchen side yet because that is an exciting post for another day. So here is a snippet..

Screen Shot 2015-11-15 at 10.30.38 PM.png

I think it’s safe to say we’ll be sticking to DIY for a while. Lesson learned.

One Shade of Grey

DIYCatharine KlepacComment

One of the first things that we like to do when we move into a house is to slap a fresh coat of paint on the walls. Since this house was a rental for so many years, every wall was covered in glossy white paint. Now I love me some white paint, but the gloss just had to go. We get it, it's wipeable when it's that shiny, but we don't live in a doctor's office. 

We wanted to keep it light and bright, while still giving the walls enough contrast to allow for all of the trim to pop a little. So we went with Benjamin Moore's Perspective color matched to Valspar's Ultra Premium paint in a satin finish. It is seriously the perfect grey. And it only took one coat. Hallelujah!

We started with the living room, behind a bookshelf in case we messed up or didn't absolutely love the color. Lucky for us, it was just what we wanted. When we first applied it we were a little scared because it almost looked white, but once it was dry it was the perfect shade of grey. When we paint, we like to tag team each room and each person has their role. I cut in all the trim, and Derek rolls. It's always been that way since 2009. When we met. And I made Derek help me paint my apartment. Now we just need to repaint all of the trim bright white because the oil paint has definitely yellowed over the years. That will be a much bigger task for sure.

Mr. Snoozin' and Treats

Mr. Snoozin' and Treats

I just love how bright each room feels, and how the walls just pop against the freshly stained floors. We decided against having every room a different color for once, and carried this color throughout the whole house for the most part. The master bedroom and bathroom will be a little different. What can I say? Old habits die hard.

Mirror Mirror

DIYCatharine KlepacComment

When we first toured our house, the first room you walked into was a super crowded living room that was connected to a dining room that opened to the kitchen. We knew our furniture would never fit in this weird long and narrow shared space. So we decided to flip the two rooms and have the dining room be on the side with the fireplace (when you first walk in) and then the living room would be off of the kitchen. I'm sure it sounds weird, but it just made more sense for us. We really didn't like the idea of walking straight into the living room. We felt like the dining room allowed for a bit of a pause.

I have since created a small entry space for when you first walk in which acts as a sort of touch down area. It has a small shelf with various bowls for keys, leashes, change, etc. I knew that I wanted to add a mirror to the wall above the shelf, but the space was very tall and narrow, which made finding just the right mirror almost impossible. I remembered this image I had saved in my inspiration folder back in 2010, and kept my eyes peeled for a mirror with similar proportions.

DSC_0120.jpg

via

We live a couple blocks away from a street lined with several thrift/antique shops. I try to scope them out once a month or so because honestly they don’t turnover their inventory that fast, and all the new things are set outside on the street so I can just oogle it all as I drive home everyday (while almost rear-ending the person in front of me because. priorities.). When my mom was in town visiting, we stumbled upon the perfect mirror and it was only $18!

The "wood" was actually this weird wood-look plastic, but I didn't really care because I had big plans to paint it. I hated that I found the mirror at this particular shop because I really dislike how manipulative the shop owner is. I'm all about wheeling and dealing when it comes to vintage finds, but this guy is just the worst. He'll do the whole "you better buy it now because I've had several people say they are coming back for it" every. single. time. Also, everything is usually marked up ridiculously high and then "on sale" and the sale price is what it should have cost to begin with. That kind of thing. When we went to track down our BFF shop owner, he informed us (again) that “all prices are negotiable” which I always think.. yay! haggling! In the past when I’d see a big piece (like a dresser or pair of chairs or something) that was marked $300 he’d take it down to $175 if I “get it right now” (which.. when else would I get it?), so I had high hopes for my (already super cheap) mirror. So after he dug it out of it’s super buried corner, he said “I’ll give you a good deal on this! how about 17.50!!” What. Whatever, I bought it anyway because I really liked it and I knew it would work perfectly in our entry. This guy.

Even though the frame was just plastic, the mirror was about 50lb, so I didn’t really want to take it apart to paint it. Instead I just covered the mirror  part with paper and taped it off.

I wanted it to be sort of a moody color because I had big plans for the shelf below it, which Derek made in high school shop. How cute is that? So I ended up going with a navy-ish color by Valspar in a satin finish because let's face it, the mirror is shiny enough. I primed the frame first with my trusty plastic primer and then sprayed on two coats of the navy. Luckily it dried a lot darker than the lid.. I was a little nervous at first that it wouldn’t be “navy” enough.

Afterward I removed all of the paper and tape and scraped off any excess paint from the mirror with a razor blade. 

IMG_9895.jpg

I’m pretty pleased with how it turned out, and I love the little pop of color it adds to the space.  

Out of Sight. Out of Mind.

DIYCatharine KlepacComment

For those of you who didn’t know, historic neighborhoods tend to be very.. cozy. Our house is literally 5 feet away from our neighbors to the right, and about 10 feet from the neighbors on the left. Luckily we have over 26 windows, which we love. But. Most of these windows are along the walls that look straight into our neighbor’s windows. The most awkward of which is the bathroom window. It’s not that bad during the day, but at night it’s basically a glowing fishbowl of teeth brushing and sprinting into the shower.

The house came with cheap-o mini-blinds on most of our windows (which have since been replaced), which works for us, but we didn’t want to really have blinds in the bathroom or kitchen because then we wouldn’t be able to open either set to let light in without A. being on display to the whole neighborhood or B. having to see unsightly junk in our neighbor’s side yard.

Let’s get a closer look.

People think I'm kidding when I tell them about how messy our neighbors' house is. I mean. No one wants to look at that while cooking. Or doing anything really.

Our front door is a craftsman style which is original to the house, but it also has windows which makes it really awkward when answering the door (or more importantly pretending like you’re not home). That being said, frosting the windows seemed to be the best option for us. We've used this method in the past, and it's such an inexpensive way to gain a little privacy, but is still temporary in case you change your mind down the road.

To prep the windows we would be frosting, I first cleaned them with ordinary glass cleaner, and used a razor blade to scrape off any excess paint from previous sloppy painters. There was a LOT of paint to scrape. And neighborhood watch stickers. Because those keep you safe.

IMG_9740.JPG

So much cleaner already!

We picked up a roll of frosted film, along with an applicator kit and got to work. After cleaning all of the windows with glass cleaner, we cleaned them again thoroughly with the application spray. We made sure to scrape off any fleck of paint or dirt so that we had a squeaky clean surface. Remember: Any speck of anything on the window will create permanent bubbles.

We cut our first piece leaving 1" extra on each side, which will be trimmed later. Then we placed a piece of scotch tape on each side of the film and press it together without sticking the tape to itself, and peeled it apart to separate the film from the backing. We made sure to only peel the backing halfway off the film. This will help it not stick to itself when applying it to the window.

One person was the sprayer (me) and the other person was the get-sprayed-on-er (Derek). We soaked the window, and both sides of the film (yes, even the sticky side) The wetter it is the easier it will be to squeegee and get all of the bubbles and imperfections out. We were also able to life it back up and re-apply it as need be because it was so wet. 

We then stuck it to the window and removed the rest of the backing. We were sure to leave the extra inches on each side of the window surface and started squeegee-ing away! Derek was the squeegee-er and I was the cutter.

IMG_9754.JPG
Screen Shot 2011-08-14 at 12.09.39 PM.png

While squeegee-ing we were sure to work from top to bottom and left to right getting out as many bubbles as possible. Once all of the bubbles were pushed as close to the edges as we could get them, it was time to trim off the excess. We used the blade that came with our kit and lined it up with the window panes and carefully trimmed along the edges on all four sides. I saved the corners for the end so that the excess film won’t fall onto itself and create a huge mess.

Once all of the extra film was gone, we continued to squeegee all of the remaining bubbles and push them to the edges. Depending on how warm it is outside, you only have 24 hours until the film officially adheres incase you aren’t satisfied with any imperfections that might show up.

The whole project took about an hour (after the cleaning/scraping). This is definitely an easy fix for anyone who is needing a little privacy while still taking advantage of as much natural light as possible. And now for a little before-and-after action.

△ B E F O R E △

△ A F T E R △

The bathroom has a lot more privacy now too, especially at night.

△ B E F O R E △

IMG_9744 copy.jpg

△ A F T E R △

I’m still trying to find the perfect mirror to go above the sink. Right now we have to do the toothbrush tango. And I can only imagine what a pain it must be to shave in these conditions.

△ B E F O R E △

IMG_9755.jpg

△ A F T E R △

We also removed the screen door that was just hanging on by a thread. It didn’t even close all the way and it blocked our pretty craftsman door. Now all we need to do is repaint the exterior, decide on a color for the front door, and swap out the hardware and we’ll really be in business!

I plan to frost the back door as well, but it has a lot of extra elements (like a cat tapestry) that need to be taken care of before it can be frosted. Meow.

Ditching the Popcorn Asbestos We Can

DIYCatharine KlepacComment

One of the first things we knew we would change ASAP during our first walkthrough of our house was the disgusting popcorn ceiling in our living / dining room. Every other room in the house as close to a Level 5 gypsum board finish, but the biggest room of the house had super attractive popcorn caked on the ceiling. 

We’re assuming they wanted to hide some cracks or leaks since it had been used as a rental for so long, and popcorn ceilings tend to be a quick fix. Why? I have no idea. We were sort of in a pickle though because we knew our house is 80 years old, but we had no idea when the popcorn was applied. Meaning. We had no idea if the popcorn contained asbestos or not. We had initially planned to scrape the ceilings ourselves but the fear of the unknown (and the type of cancer that runs in my family) was weighing heavily on us, and we both agreed that professional abatement was the way to go. We knew that we needed to have it removed before we moved in. Otherwise. Holy mess. So we had a few contractors come out to give us their bids, and they got to work right away.

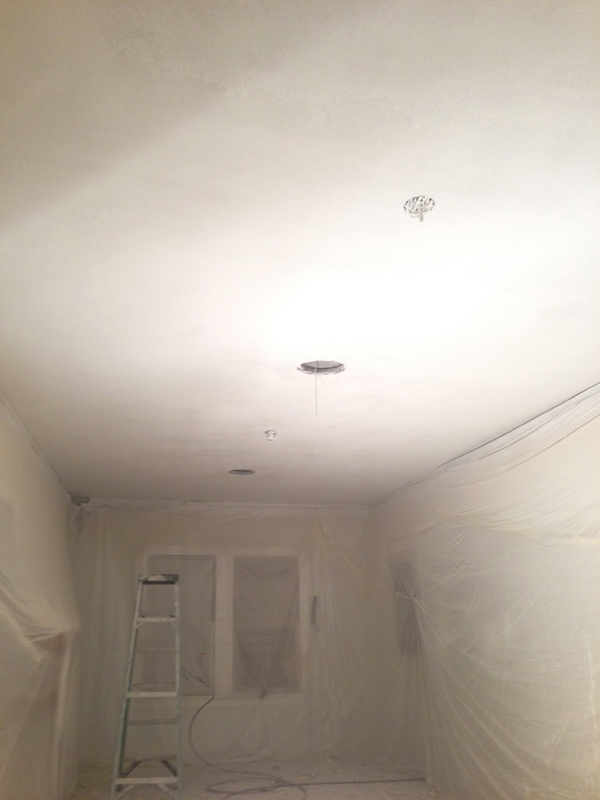
They covered our freshly refinished floors with paper, then literally covered every surface except for the ceiling with plastic. It was like a plastic fortress.

All of the white on the floor? Yeah that was popcorn.

IMG_9546.jpg

They removed all of the popcorn, reinforced our ceiling in a few areas, retextured it with a nice orange peel finish, and painted it flat white. They couldn't go back in with a Level 5 finish because cracks in San Antonio are absolutely unavoidable, and the orange peel had helped to hide any that have crept along when our house shifts after a good rain. Let’s take one last look at the before.

△ B E F O R E △

IMG_9553.JPG

△ A F T E R △

Isn’t it so much better? It honestly makes the ceilings look higher. Probably because we no longer have stalactites hanging over our heads. We had them completely remove the gross (and sagging) ceiling fan and crystal chandelier (which we gave to a neighbor) because we knew were going to replace them. Also we knew we wanted to have our dining room near the fireplace and our living room where the chandelier is. It just didn’t make sense to leave them up even though we didn’t have anything to go up in their place.

Although it was really hard for us to not DIY this one, in the end it was the safer choice to have the professionals take care of it. Also. That would have been pretty messy. Luckily because they Dexter-ified the whole room they were able to just roll it all up and our freshly refinished floors were left in pristine condition.


topsites://