made X modern

DIY

DIY: Christmas Book Advent Calendar

DIYCatharine KlepacComment
IMG_7449 2.jpg

I have spent way longer than most people should, trying to figure out what advent calendar tradition I wanted to start with Olivia. I always had an advent calendar growing up where you would take plush ornaments out of their numbered pockets and place them on a velcro tree. It was alway so exciting to countdown to my favorite day of the year. I tried to find something similar, but nothing was really to my liking. I found several ideas where you get a gift or candy each day, but with an (almost) 10 month old, she doesn’t really need (or care about) trinkets or sugar.

Then I thought about what she does enjoy: BOOKS! So I started making .a list of my favorite Christmas / holiday / winter themed books, and then researched some recommendations from friends and other bloggers. I wanted all of the books to follow suit with the rest of her library in which they all have a thoughtful message and are beautifully illustrated.

Obviously there are 100 versions of The Twelve Days of Christmas, but I was very particular about which version I ended up choosing based on the illustrations. Or with The Mitten, I chose the version that I remember reading as a child.

Screen Shot 2018-11-27 at 5.09.11 PM.png
Screen Shot 2018-11-27 at 5.09.18 PM.png
Screen Shot 2018-11-27 at 5.09.26 PM.png

The Nutcracker | The Polar Express | The Little Drummer Boy | The Twelve Days of Christmas  | White Snow Bright Snow | The ABCs of Christmas | Merry Christmas Ernest and Celestine | The Very First Christmas | Olive the Other Reindeer | Kangaroo for Christmas | The Mitten | Red and Lulu | The Night Before Christmas** | Mice Skating | Madeline’s Christmas | S is for Santa | The Little Reindeer | Olivia Helps with Christmas | When Santa Was a Baby | How the Grinch Stole Christmas | A Wish to Be a Christmas Tree | Last Stop on the Reindeer Express | Pick a Pine Tree | If You Take a Mouse to the Movies | Rudolph the Red-Nosed Reindeer

** Fun fact: I had this exact 1988 version of The Night Before Christmas growing up, and had been searching all over Amazon and Ebay for it, but it was a zillion dollars. When one day I was perusing a random Christmas book cart at Half Price Books and there it was! For a whopping $4. All of the pop ups are completely intact. I couldn’t believe it.

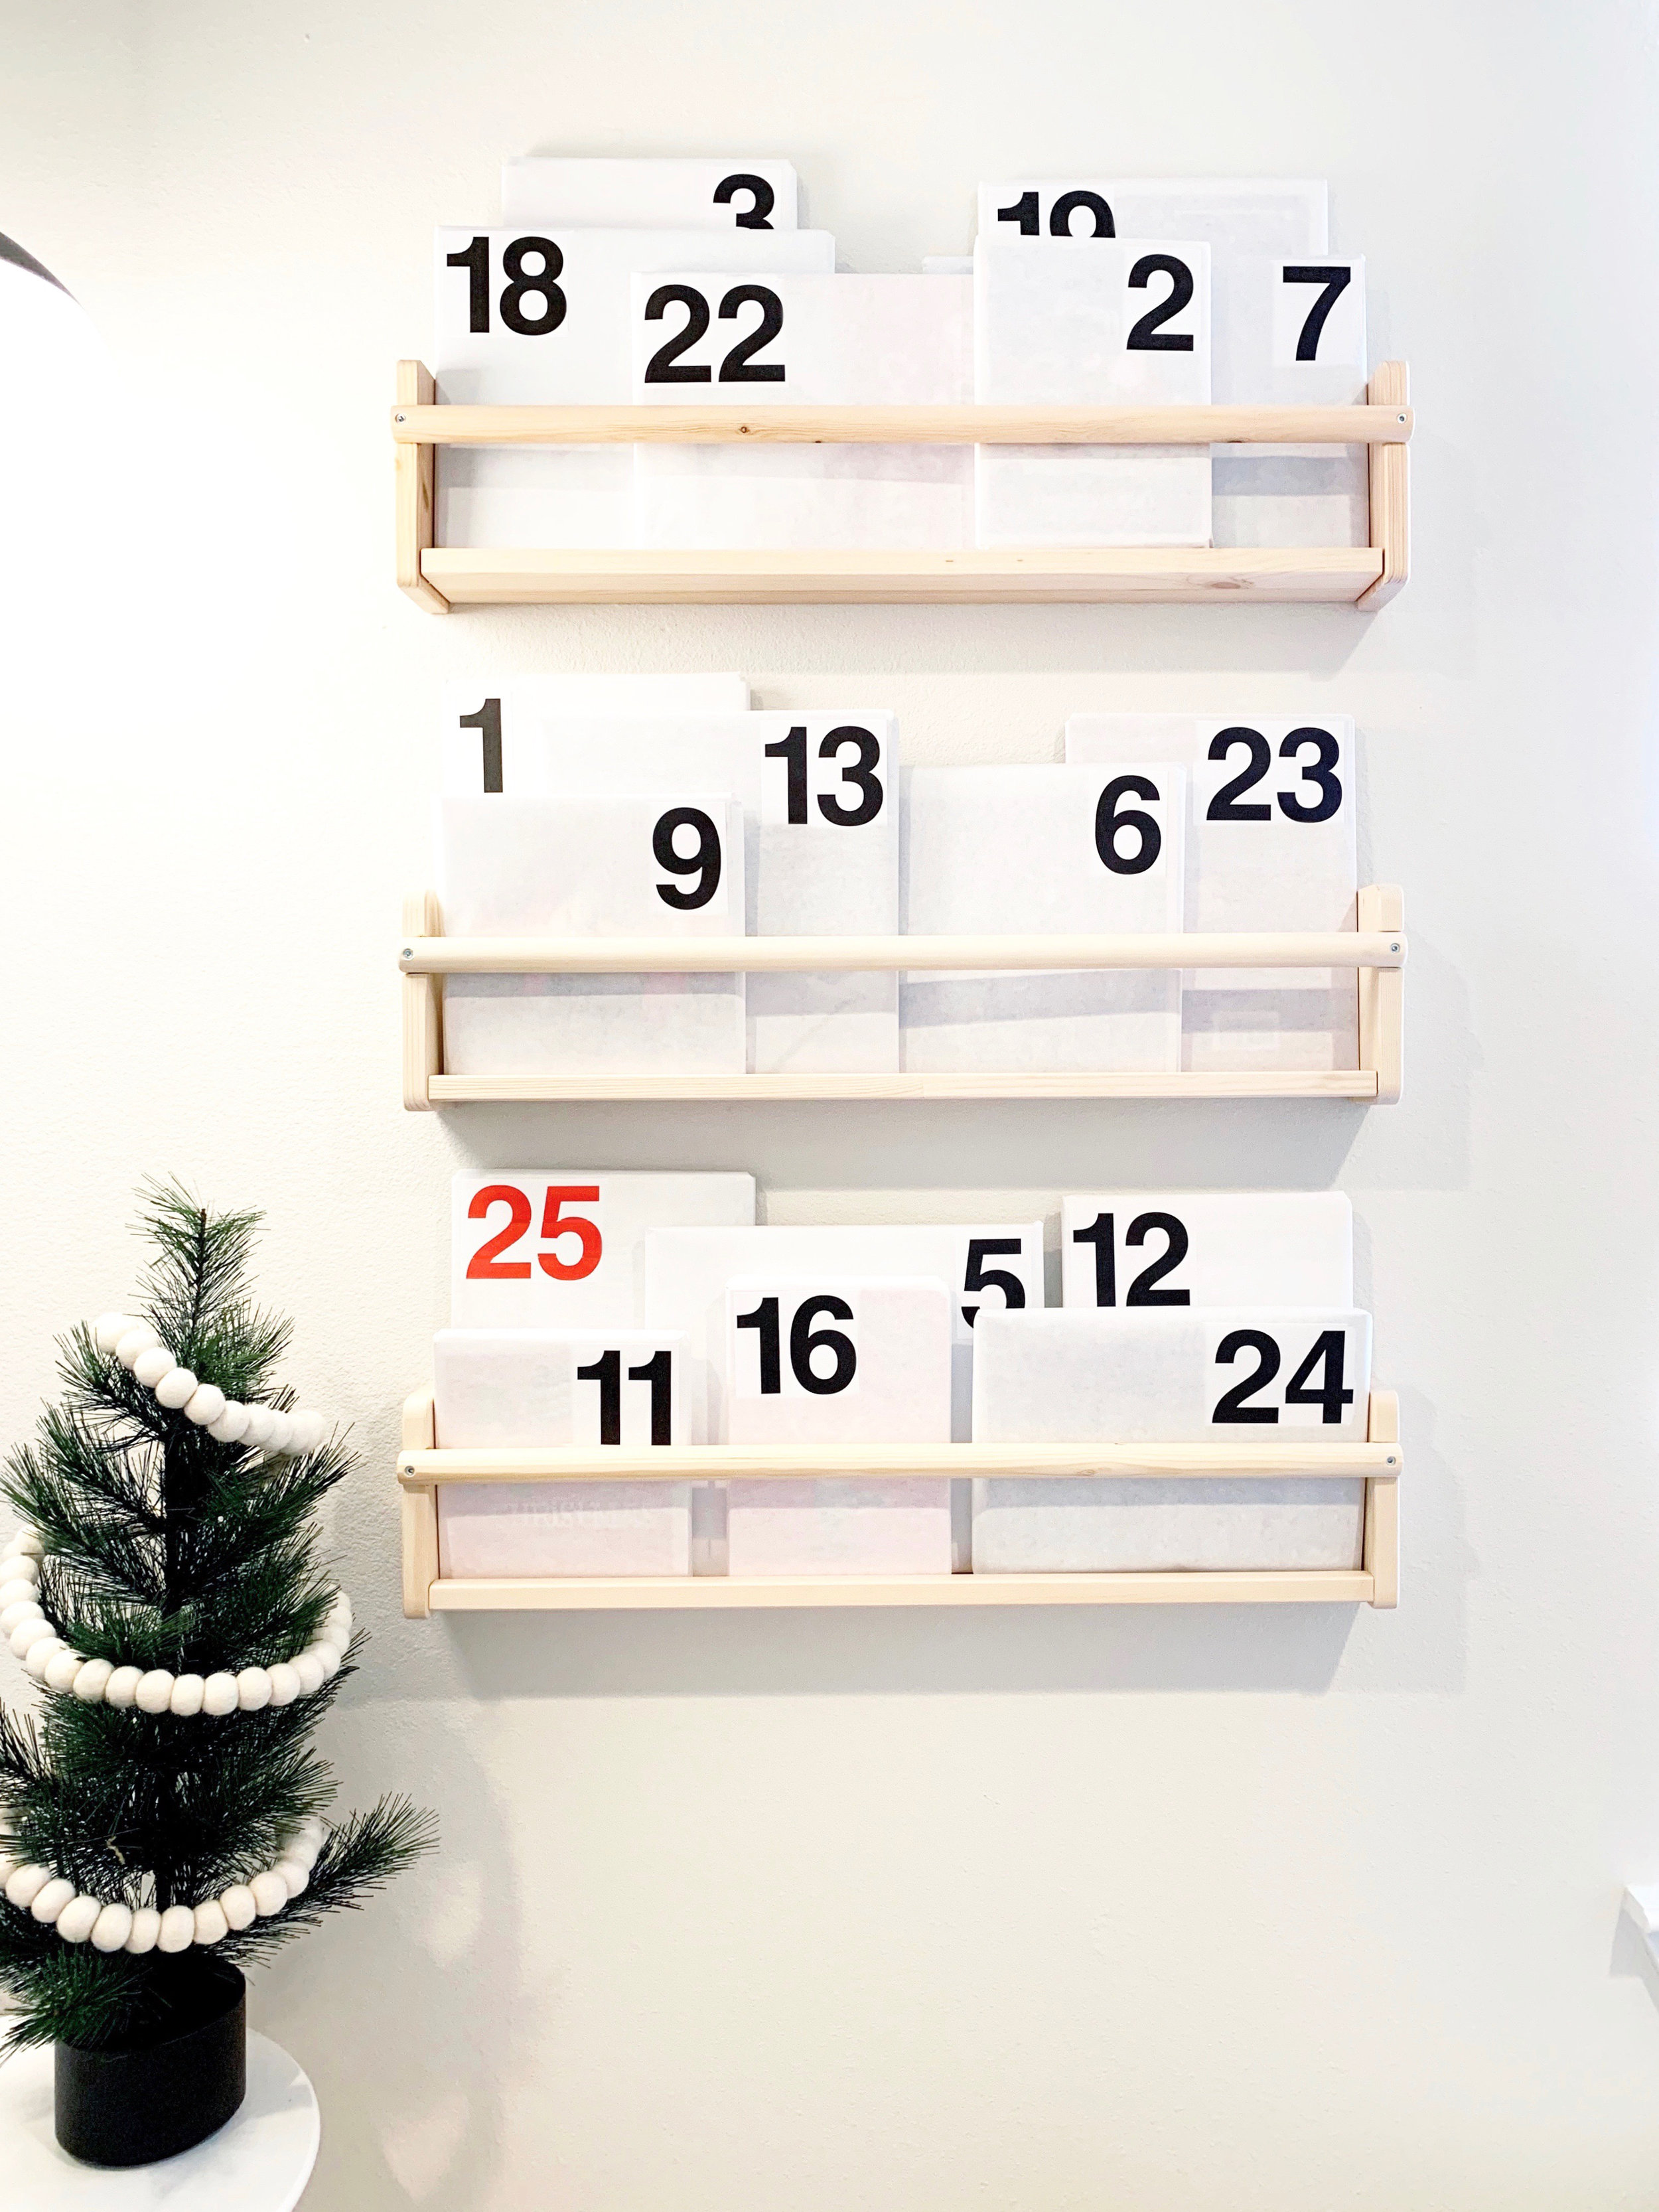
I used white paper to wrap each book as I wanted to keep them all simple and uniform. Then I printed out numbers on label paper and stuck them to each wrapped book. Pretty simple stuff. I didn’t wrap these in any particular order, and plan to mix them up each year which I’m hoping will build the anticipation to unwrap her favorites. However, I did make sure that The Twelve Days of Christmas is opened on the 12th day of December, that The Night Before Christmas is opened on Christmas Eve, and The Little Drummer Boy is opened on Christmas Day. Other than that, totally random.

Obviously there are more than 25 amazing Christmas books, so I also have a backup list I can choose from when I start to rotate out some of the younger titles. Also, as she gets older I plan to include the actual Nutcracker and A Christmas Carol, but I personally feel like they are a little to scary for her. Did anyone else have nightmares about sword fighting mice? Just me? Cool.

I am so excited to start this tradition with Olivia, and share in the magic of the season. What type of advent calendar do you like to use?

The Kitchen Reveal: Before & Afters

DIYCatharine KlepacComment

In case you missed Part IPart IIPart IIIPart IV, Part V, Part VI, Part VII, Part VIII, and Part IX of our kitchen renovation saga be sure and check them out before we dive into the moment you've all been waiting for: THE BIG REVEAL!

_b 2.jpg
_9.jpg
_8.jpg
_2.jpg
_1.jpg
_3.jpg
_4.jpg
DSC_0302black.jpg
DSC_0373 copy2.jpg
_a.jpg
_7.jpg
DSC_0317.jpg
DSC_0305.jpg
DSC_0334.jpg
DSC_0320.jpg
DSC_0348.jpg
DSC_0323.jpg
DSC_0314.jpg
DSC_0311.jpg
DSC_0395.jpg
DSC_0324.jpg
DSC_0374.jpg
DSC_0339.jpg
DSC_0347.jpg
_b 2.jpg

And now for some pretty shocking before and afters (my favorite).

IMG_9335.JPG
DSC_0322-black.jpg
IMG_9334.jpg
IMG_5241.jpg
IMG_9336.jpg
DSC_0332.jpg
IMG_9337.JPG
DSC_0333.jpg
IMG_9339.jpg
DSC_0319.jpg
IMG_9340.jpg
DSC_0308.jpg

 So there you have it, our full kitchen renovation. And yes, I’m super sad that I only got to enjoy it for a month before we moved to Dallas. But it just makes me even more excited for our next renovation. If you have any questions about our kitchen or renovation process feel free to leave a comment below. Or if you are looking to hire someone to tackle your next project, I’m taking on a couple more new clients this fall.

| S O U R C E S |

Flooring | Lower Cabinets (via Habitat Restore) | Hardware | Countertops | Tile Backsplash | Faucet | Floating Shelves (custom) | Vent Hood Insert and Liner | Vent Hood Wrap (custom) | Upper Cabinets (custom) | Steel Backsplash (custom) | Barn Light Sconce | Pendant Lights | Can Lights | Island (vintage) | Fridge | Range | Dishwasher | Sink | Bowls + Dishes | Glasses | Tea Glasses | Stainless Steel Bowls | Cutting Board | Straight Canisters | Tapered Canisters | Utensil Holder

Here are all of the posts in case you missed any:

Part I: A Brief History

Part II: Our Design Plan

Part III: Lighting Up the Joint

Part IV: #demoday

Part V: Our Not So Custom Cabinets

Part VI: Countertops + Hardware

Part VII: Installing Our Steel Backsplash

Part VIII: The Oven Wall

Part IX: The Sink Wall

The Kitchen Reveal: The Sink Wall

DIYCatharine KlepacComment

In case you missed Part IPart II, Part III, Part IV, Part V, Part VI, VII and Part VIII of our kitchen renovation saga be sure and check them out before we dive into the installation of unique subway tile pattern and our custom floating shelves.

With our old house and it's wonky walls, we decided to have our friend Max install the tile on the sink wall. We had him apply Mapei Aquadefense which is a waterproofing and crack isolation / decoupling membrane that we use on all of our residential projects. 

For the tile we wanted a subway tile, but we wanted to get a little jazzy with the overall look. We chose a traditional 3x6 tile but in a matte finish. The line we chose was Rittenhouse Square by Daltile in Arctic White. We also battled over what the installation pattern should be for a pretty ridiculous amount of time, but in the end settled on a vertical running bond. See? While most married couples argue about where to go for dinner. These are our arguemnts haha. 

IMG_3547.jpg

We wanted to use a darker grout, but not too dark, and ended up choosing Mapei Cobblestone. We had him tile right up to the window knowing that we would be adding new trim around the window for a nice clean look. The original window didn't have an apron which we just hated, so we had him start a solid row of tile along the counter and then the new window apron would conceal any gaps or cut tiles. 

IMG_4873.jpg
IMG_4874.jpg
IMG_4876.jpg

After the tile was grouted, Derek added 1x2 trim that he cut a rabbit out of so that it would sit nicely along the edge of the existing window frame.

IMG_4883.jpg

He then added a 1x6 apron that he cut down to a 1x5 size, and screwed it into place.

IMG_4885.jpg

We wanted to have this side be much more open than the oven side, so we decided to have floating birch plywood shelves. However, we need to have really strong mounting hardware, but we didn't want to see it. So we sketched out a few different options and then basically settled on a really fancy (and much stronger) version of the Ikea Lack floating shelf system. So Derek welded together square tubing onto steel flat bar stock pieces that he had cut to size for each shelf.

He then created a jig to map out where he would be routing out the plywood for each piece of square tubing to slide into place. This also insured that the tubing was connected to the flat bars as square as possible.

IMG_6008.JPG
IMG_6010.JPG
IMG_6011.JPG

He used a router to hollow out each area where the square tubing would reside to create a nice and snug fit.

IMG_6075.JPG
IMG_6072.JPG
IMG_6108.JPG
IMG_6107.JPG

He then repeated this process on each 3/4" piece of plywood that would then be laminated together to create one thick 1.5" shelf. 

IMG_6106.JPG

Weight was a big concern because we would not only be mounting the shelves themselves, but also what would be sitting on them. So to take some of the weight out, Derek routed out several rows of material on each shelf which in the end saved about 5lbs per shelf.

IMG_6110.JPG

After all of the shelves were hollowed out, he then laminated each side together to create one solid shelf. Clamps much?

IMG_6113.JPG

Once the shelves were laminated together, he then sanded and finished all of the shelf edges and applied a couple coats of Minwax Wipe On Poly in satin finish. 

In order to mount each of the shelf brackets we used painters tape as a template to place each piece and mark where the holes would be drilled into the tile. Which was basically the moment my heart stopped beating.

IMG_4890.jpg
IMG_4891.jpg
IMG_4892.jpg

After each of the brackets were mounted to the wall all we had to do was slide each shelf into place. I then painted all of the window trim and the new apron white while giving a little pop of eyeliner with some black paint on the window sash. Hubba hubbah.

_5.jpg
_1.jpg
_3.jpg
_8.jpg
_b 2.jpg

Stay tuned for Part X of our kitchen renovation saga for the moment you've all been waiting for in this painfully long 10 part series. THE BIG REVEAL!

The Kitchen Reveal: The Oven Wall

DIYCatharine KlepacComment

In case you missed Part IPart II, Part III, Part IV, Part V, Part VI, and Part VII of our kitchen renovation saga be sure and check them out before we dive into the installation of our custom upper cabinets and vent hood wrap.

We tossed around the idea of having a more industrial looking exposed vent hood over our stove, but in the end decided to integrate it into our upper cabinets. We bought a Broan Range Hood Insert and a coordinating Hood Liner that were 30" wide to line up perfectly with the stove below.

IMG_4317.JPG
IMG_4319.JPG
IMG_4318.JPG

Derek fabricated a birch plywood surround that extends all the way to the ceiling for a nice seamless look. I'm sure a lot of people are thinking "plywood?" But this isn't the cheap-o stuff you use to line your shed with. This is 13 ply furniture grade birch plywood. We love the light birch color and seeing the layers of ply along the edges. It's a little nod to our love of case study house architects, and it's another detail found throughout our home.

For the upper cabinets, Derek fabricated two long 15" x 15" rectangular birch plywood boxes to sit on either side of the vent hood wrap. We hate the idea of not being able to reach everything in your upper cabinets so we kept these long and skinny for a more modern twist. The 15" depth was determined by the depth of our turkey pan so I could finally have a place to store it haha.

IMG_4616.JPG
IMG_4491.JPG
IMG_4492.JPG

For the doors we wanted to have sliders in lieu of traditional cabinet doors. Derek made the sliding doors out of masonite which he painted a high gloss white, and cut out a large 2" diameter finger hole on each end. He routed out a grooved track along the top and bottom of each upper cabinet for the masonite to glide seamlessly, and purposely exposing the plywood edges along all sides of the cabinet fronts.

IMG_4633.JPG
IMG_4632.JPG

Derek and our friend Max installed the upper cabinet boxes on each side of the vent hood wrap, and they fit perfectly.

IMG_0633.jpg
IMG_4675.JPG

Then they slid the glossy white doors into place and everything started to come together.

DSC_0338.jpg
DSC_0312.jpg
DSC_0305.jpg
DSC_0339.jpg
DSC_0316.jpg

We wanted to have concealed upper cabinet storage on this wall for more unsightly items like the turkey pan, my hoarding of cake stands, Derek's hoarding of pint glasses, etc. because we will be having floating open shelves on the sink side of the kitchen.

Stay tuned for Part IX of our kitchen renovation saga where I'll share our (not so common) tile installation and custom floating shelves.

The Kitchen Reveal: Installing Our Steel Backsplash

DIYCatharine KlepacComment

In case you missed Part IPart IIPart IIIPart IV, Part V, Part VI, and Part VII of our kitchen renovation saga be sure and check them out before we dive into the installation of our custom hot rolled sheet steel backsplash. I know it sounds crazy.

On the oven side of the kitchen we wanted to have a unique backsplash other than your typical tile. This isn't a wet area where tile is a necessity, so we wanted to have a little fun with it. We both love the look of hot rolled sheet steel with its natural mill scale and deep black color swirls. Also, the fact that it is magnetic was a fun bonus so that we could pin up recipes while we cook.

That shelf line you see to the right will be a thin piece of sheet steel welded in place so that it sort of creates an integral blade thin shelf that will hold spices and grains. With it all just being the same material it kind of just goes away and melds into the backsplash. You'll see!

Kitchen - Elevations.jpg

The first step was to make templates out of cardboard for each piece of sheet steel that would be installed. This allowed derek to see where all of the outlet holes were and how everything would line up. Sheet steel isn't something you want to have to keep hauling around and trimming down if it doesn't fit. 

IMG_4187.JPG

He used 4x8 sheets of 14 gauge sheet steel that he cut down using a shear to match each template that he had created. Then he used a plasma cutter to cut out the finer details like the outlet holes.

IMG_4200.JPG
IMG_4188.JPG

Then we decided on the spacing and pattern of the holes so that all of the fasteners looked uniform across the entire wall.

IMG_4189.JPG

After pre-drilling and countersinking all of the holes for the fasteners he applied two coats of Mixwax Clear Spar Urethane. We really love the natural beauty of the mill scale that is produced in the factory when steel is hot rolled so we wanted to seal that in and enhance it. 

IMG_4192.JPG

I held each piece in place as Derek installed all of the fasteners, and everything lined up perfectly thanks to our cardboard templates. We decided on black oxide coarse thread fasteners so that they kind of just disappeared into the steel. You can definitely still see them but they don't stand out as other fasteners would have.

IMG_4212.JPG
IMG_4205.JPG
IMG_4211.JPG

For the thin blade shelf, Derek used a piece of 11 gauge sheet steel and tack welded it into place. He also welded on the 1 ft piece that turned the corner so that this final section was a solid unit. 

IMG_4393.JPG
IMG_4236.JPG
IMG_4244.JPG
IMG_4243.JPG
IMG_4245.JPG

See just how thin it is? I love how everything just sort of floats on top. 

IMG_4259.JPG

Stay tuned for Part VIII of our kitchen renovation saga where I'll share our custom upper cabinets and vent hood wrap that Derek also made.