
For those of you who didn’t know, historic neighborhoods tend to be very.. cozy. Our house is literally 5 feet away from our neighbors to the right, and about 10 feet from the neighbors on the left. Luckily we have over 26 windows, which we love. But. Most of these windows are along the walls that look straight into our neighbor’s windows. The most awkward of which is the bathroom window. It’s not that bad during the day, but at night it’s basically a glowing fishbowl of teeth brushing and sprinting into the shower.
The house came with cheap-o mini-blinds on most of our windows (which have since been replaced), which works for us, but we didn’t want to really have blinds in the bathroom or kitchen because then we wouldn’t be able to open either set to let light in without A. being on display to the whole neighborhood or B. having to see unsightly junk in our neighbor’s side yard.

Let’s get a closer look.

People think I'm kidding when I tell them about how messy our neighbors' house is. I mean. No one wants to look at that while cooking. Or doing anything really.
Our front door is a craftsman style which is original to the house, but it also has windows which makes it really awkward when answering the door (or more importantly pretending like you’re not home). That being said, frosting the windows seemed to be the best option for us. We've used this method in the past, and it's such an inexpensive way to gain a little privacy, but is still temporary in case you change your mind down the road.
To prep the windows we would be frosting, I first cleaned them with ordinary glass cleaner, and used a razor blade to scrape off any excess paint from previous sloppy painters. There was a LOT of paint to scrape. And neighborhood watch stickers. Because those keep you safe.


So much cleaner already!

We picked up a roll of frosted film, along with an applicator kit and got to work. After cleaning all of the windows with glass cleaner, we cleaned them again thoroughly with the application spray. We made sure to scrape off any fleck of paint or dirt so that we had a squeaky clean surface. Remember: Any speck of anything on the window will create permanent bubbles.
We cut our first piece leaving 1" extra on each side, which will be trimmed later. Then we placed a piece of scotch tape on each side of the film and press it together without sticking the tape to itself, and peeled it apart to separate the film from the backing. We made sure to only peel the backing halfway off the film. This will help it not stick to itself when applying it to the window.

One person was the sprayer (me) and the other person was the get-sprayed-on-er (Derek). We soaked the window, and both sides of the film (yes, even the sticky side) The wetter it is the easier it will be to squeegee and get all of the bubbles and imperfections out. We were also able to life it back up and re-apply it as need be because it was so wet.
We then stuck it to the window and removed the rest of the backing. We were sure to leave the extra inches on each side of the window surface and started squeegee-ing away! Derek was the squeegee-er and I was the cutter.

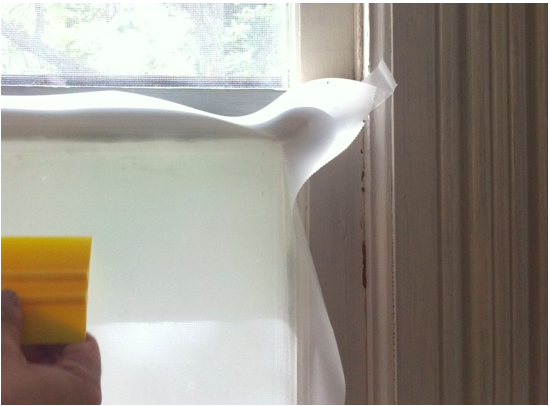
While squeegee-ing we were sure to work from top to bottom and left to right getting out as many bubbles as possible. Once all of the bubbles were pushed as close to the edges as we could get them, it was time to trim off the excess. We used the blade that came with our kit and lined it up with the window panes and carefully trimmed along the edges on all four sides. I saved the corners for the end so that the excess film won’t fall onto itself and create a huge mess.

Once all of the extra film was gone, we continued to squeegee all of the remaining bubbles and push them to the edges. Depending on how warm it is outside, you only have 24 hours until the film officially adheres incase you aren’t satisfied with any imperfections that might show up.
The whole project took about an hour (after the cleaning/scraping). This is definitely an easy fix for anyone who is needing a little privacy while still taking advantage of as much natural light as possible. And now for a little before-and-after action.

△ B E F O R E △

△ A F T E R △
The bathroom has a lot more privacy now too, especially at night.

△ B E F O R E △

△ A F T E R △
I’m still trying to find the perfect mirror to go above the sink. Right now we have to do the toothbrush tango. And I can only imagine what a pain it must be to shave in these conditions.

△ B E F O R E △

△ A F T E R △
We also removed the screen door that was just hanging on by a thread. It didn’t even close all the way and it blocked our pretty craftsman door. Now all we need to do is repaint the exterior, decide on a color for the front door, and swap out the hardware and we’ll really be in business!
I plan to frost the back door as well, but it has a lot of extra elements (like a cat tapestry) that need to be taken care of before it can be frosted. Meow.