made X modern

how to

How To: Make 5 Paneled Doors the Easy Way

DIYCatharine KlepacComment

So before we dig in, I feel like I need to give you a little backstory on the door situation in our 1930 bungie. As I've mentioned before our house has had two owners. A sweet little family back when it was originally built and then it was sold and used as a rental for 40 years. So yes it's only had two owners, but having four decades of renters means this sucker is full of cheap (lazy) bandaids and weird quirks. When we moved in all of the closets and two of the rooms had original single panel solid wood doors. 

One to the bathroom:

IMG_9362.jpg

And one to the guest room:

IMG_9377.JPG

There were two flimsy builder hollow core doors that looked like they were straight out of an apartment. 

One to the kitchen from the master (I know. Midnight snack anyone?):

IMG_9359.JPG

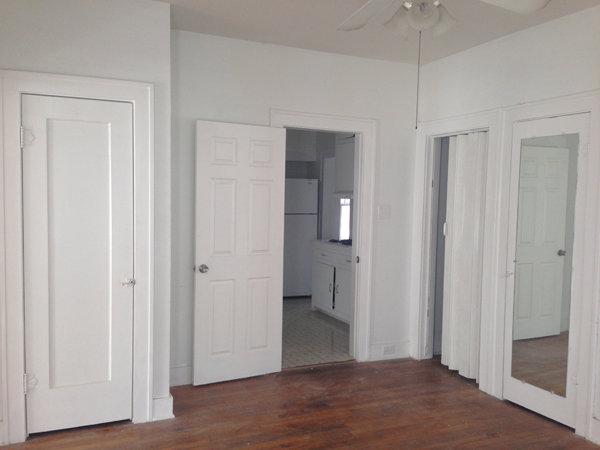
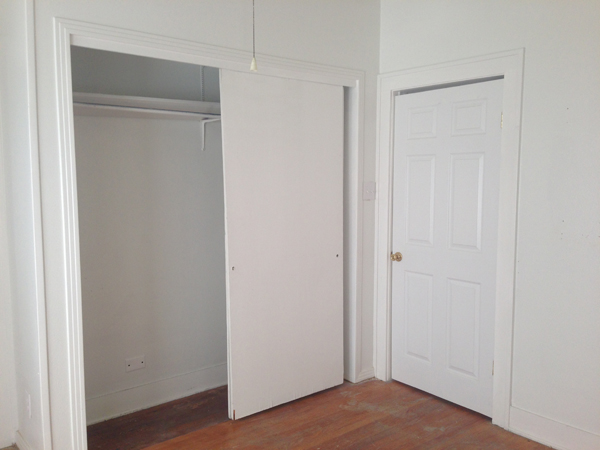
And one from the master to what is now Olivia's nursery (ooo shiny 90s gold hardware):

IMG_9352.JPG

There were also two accordion doors. Yep. 

A super gross fabric/vinyl one from the nursery to the laundry room (think those accordion partitions from the 70s that divided classrooms in elementary school. Oh and it was covered in paint): 

IMG_9350.jpg

And a shiny plastic one from the hallway to the master bedroom:

IMG_9373.jpg

When we first moved in we immediately removed all of the accordion doors because 1. they were filthy, and 2. we were not about to try and move furniture through 18" openings. Removing the door to the now nursery (then office) wasn't a big deal at all because it wasn't a true bedroom yet. However, removing the door to the master bedroom meant that we ended up not having a bedroom door for almost 5 years (!!)

Why did it take so long? Well first of all we rarely have guests so this project was not at the top of our todo list. Second of all, we had such a hodgepodge collection of doors and we eventually wanted to replace them all with 5 panel shaker doors that matched which was pretty pricey. After looking around at Lowe's and Home Depot a couple years ago, if you wanted a solid core 5 panel door it was a custom order and started at around $300 a door. Woof. We started looking at architectural salvage stores to find some we could refinish but even those started at $100 and still needed to be completed stripped and refinished from decades of abuse. Double woof. Also, having an old house means that your door openings are all different widths, that tend to be on the smaller side. Ours range from 31" - 34", which are not common door widths so it was like finding a needle in a haystack. 

So Derek had planned on building all of the doors in our house instead. He made the barn door from the laundry room to the office/nursery, and it turned out just gorgeous. However, Derek is a busy guy with lots of fabrication products on his plate and it was going to take some time to squeeze four more doors into his schedule, so I was getting a little desperate. 

A few weeks later after going to our neighbors' house we saw that they had new beautiful 5-panel doors and we were all "where did you find these?" and they were all "we cheated". So after picking their brains a bit, they explained that they just bought single panel solid core doors from Habitat Restore and added in the horizontal slats to make their own 5 panel doors. Duh. So we headed over to Habitat Restore and picked up our own single panel doors in all of the sizes we needed. Luckily they already had two original 5 panel doors in our sizes, so those were ready to be painted. Phew! We somehow crammed them all into my very small SUV #innercityliving. 

IMG_6266.jpg
IMG_6274.jpg
IMG_6275.jpg

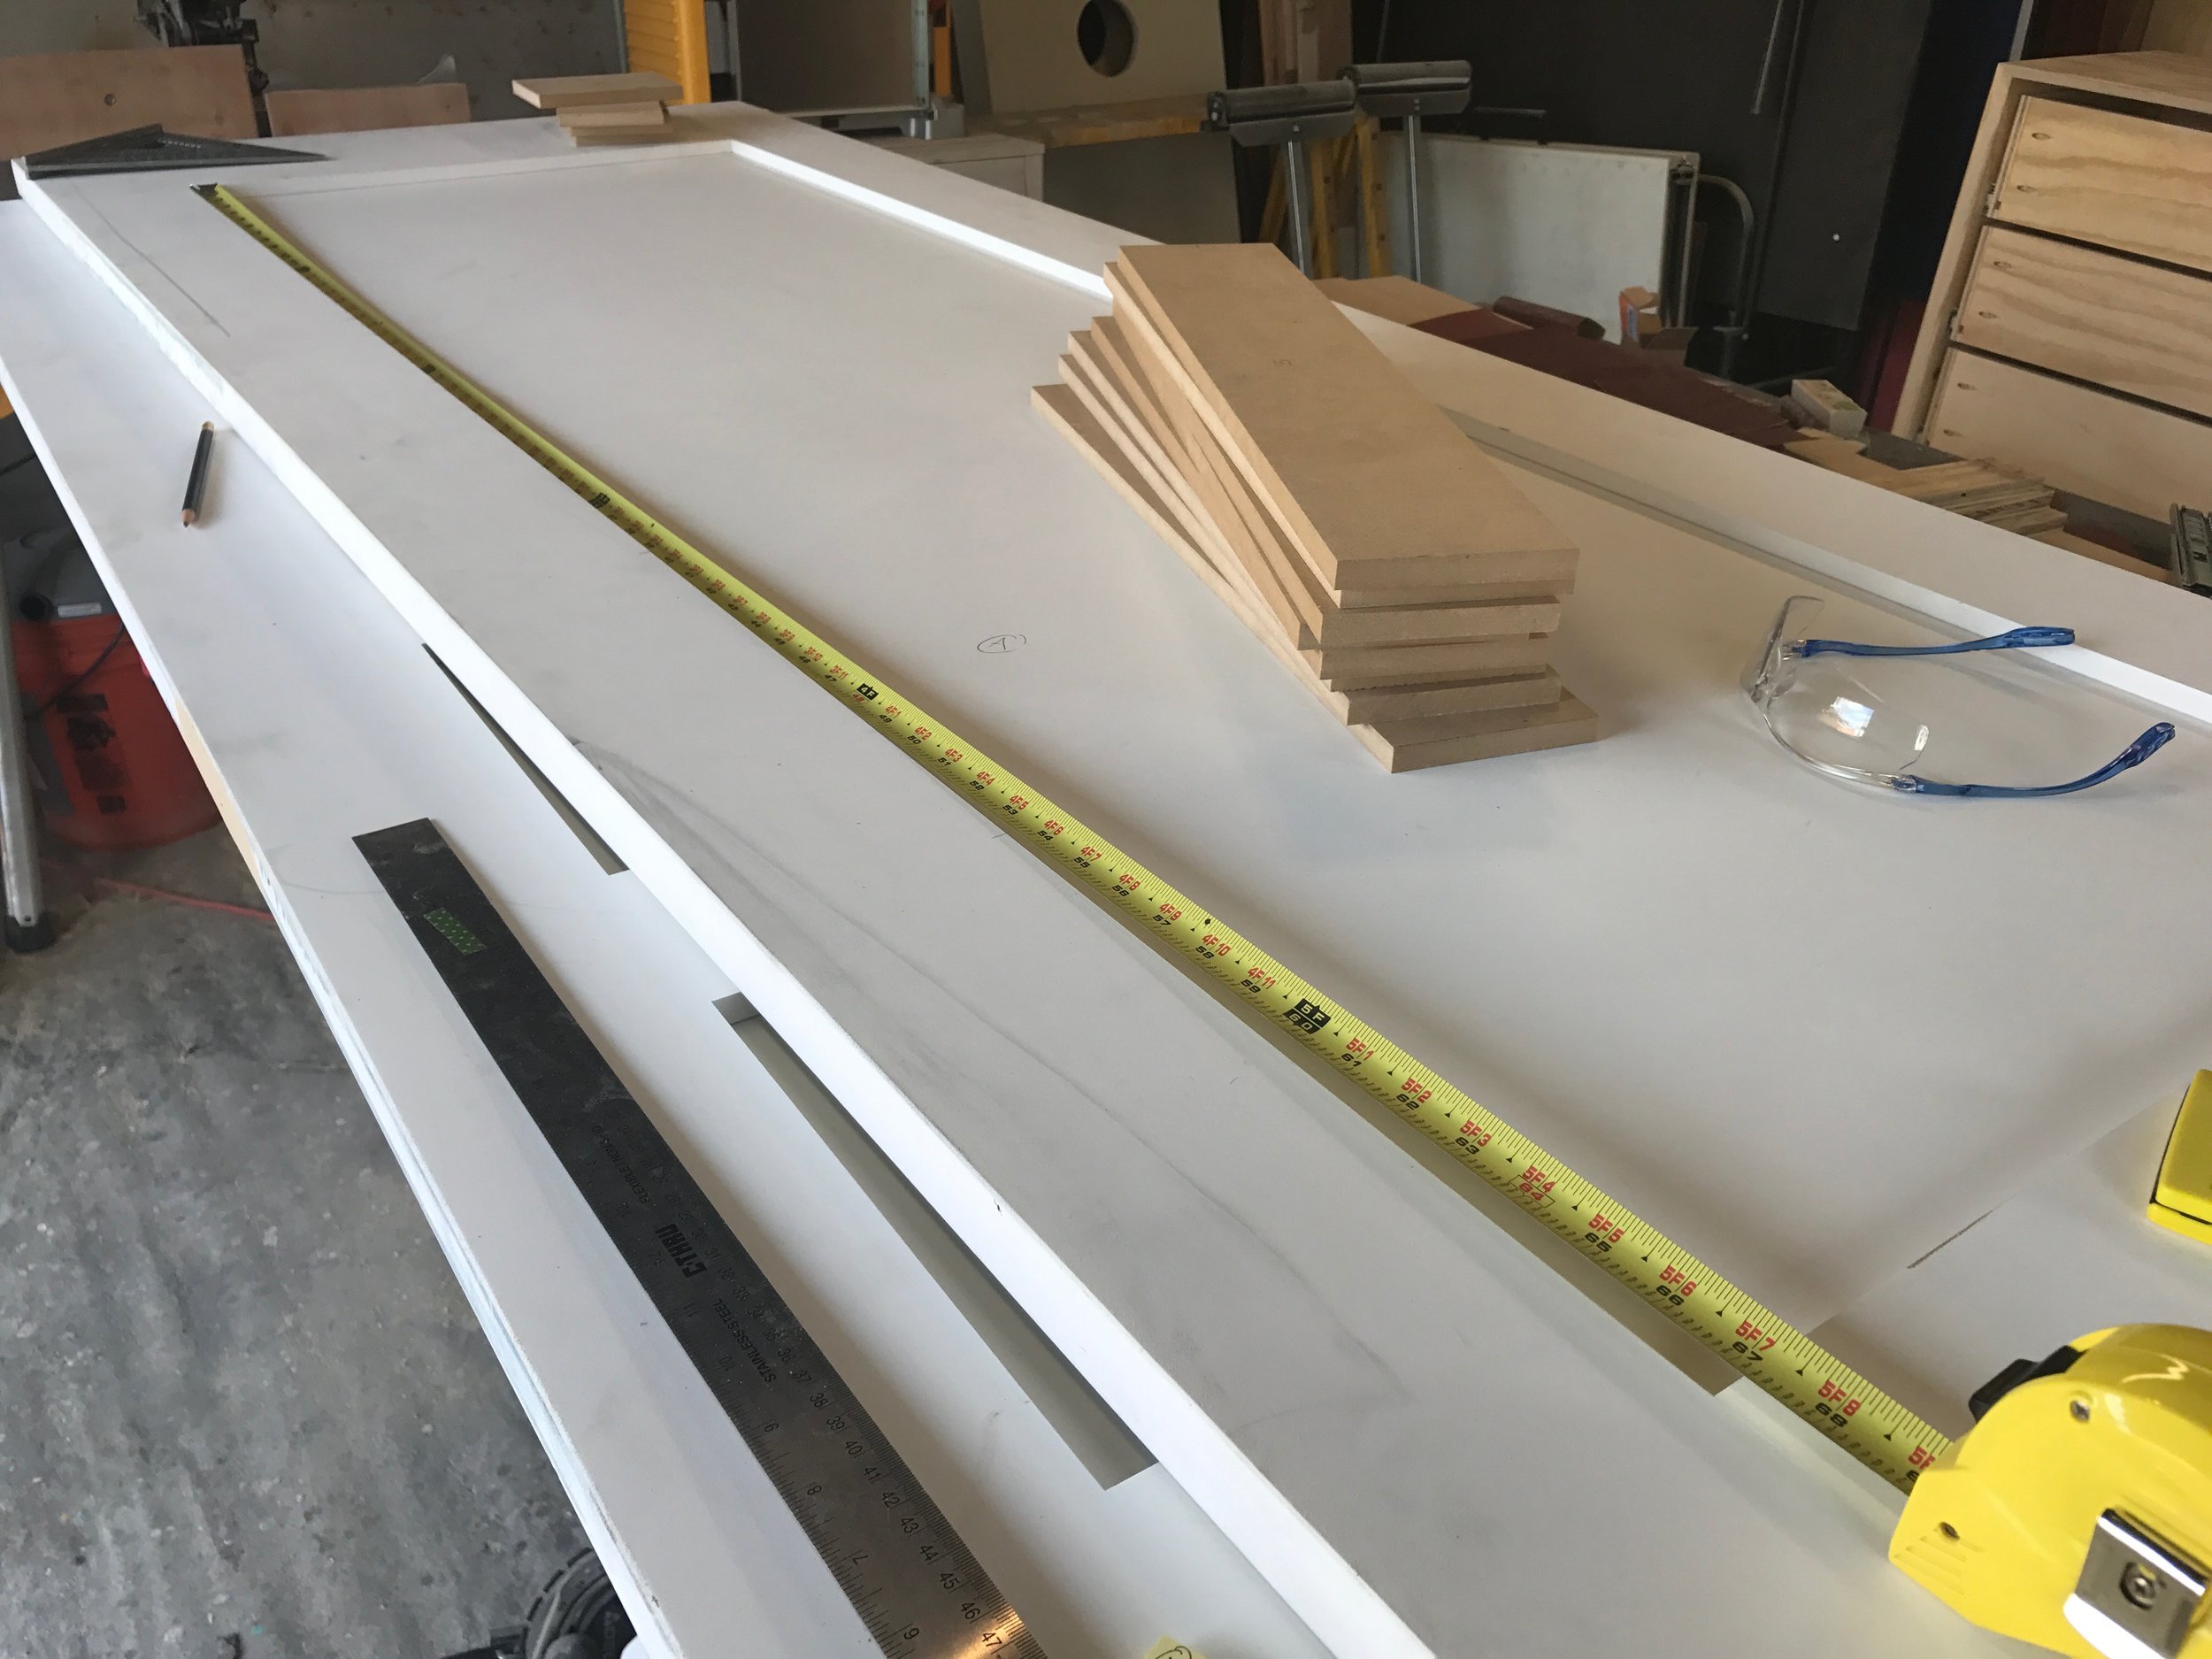
We grabbed some sheets of MDF from Home Depot and we were in business. I measured out each stile to be the same width as the stiles on the premade 5 panel doors so that they would all be consistant throughout the house, which ended up being 4". I had Derek cut the 4" stiles using the table saw, and then I used a Fine Finish blade and a chop saw to do the shorter cuts which would fit each door recess. I was sure to measure the widths of each recessed panel on every door front and back, as some varied from 1/8" - 1/4" on each side (go figure), and I wanted each stile to fit snug within the recess. 

IMG_6277.jpg
IMG_6279.jpg
IMG_6285.jpg

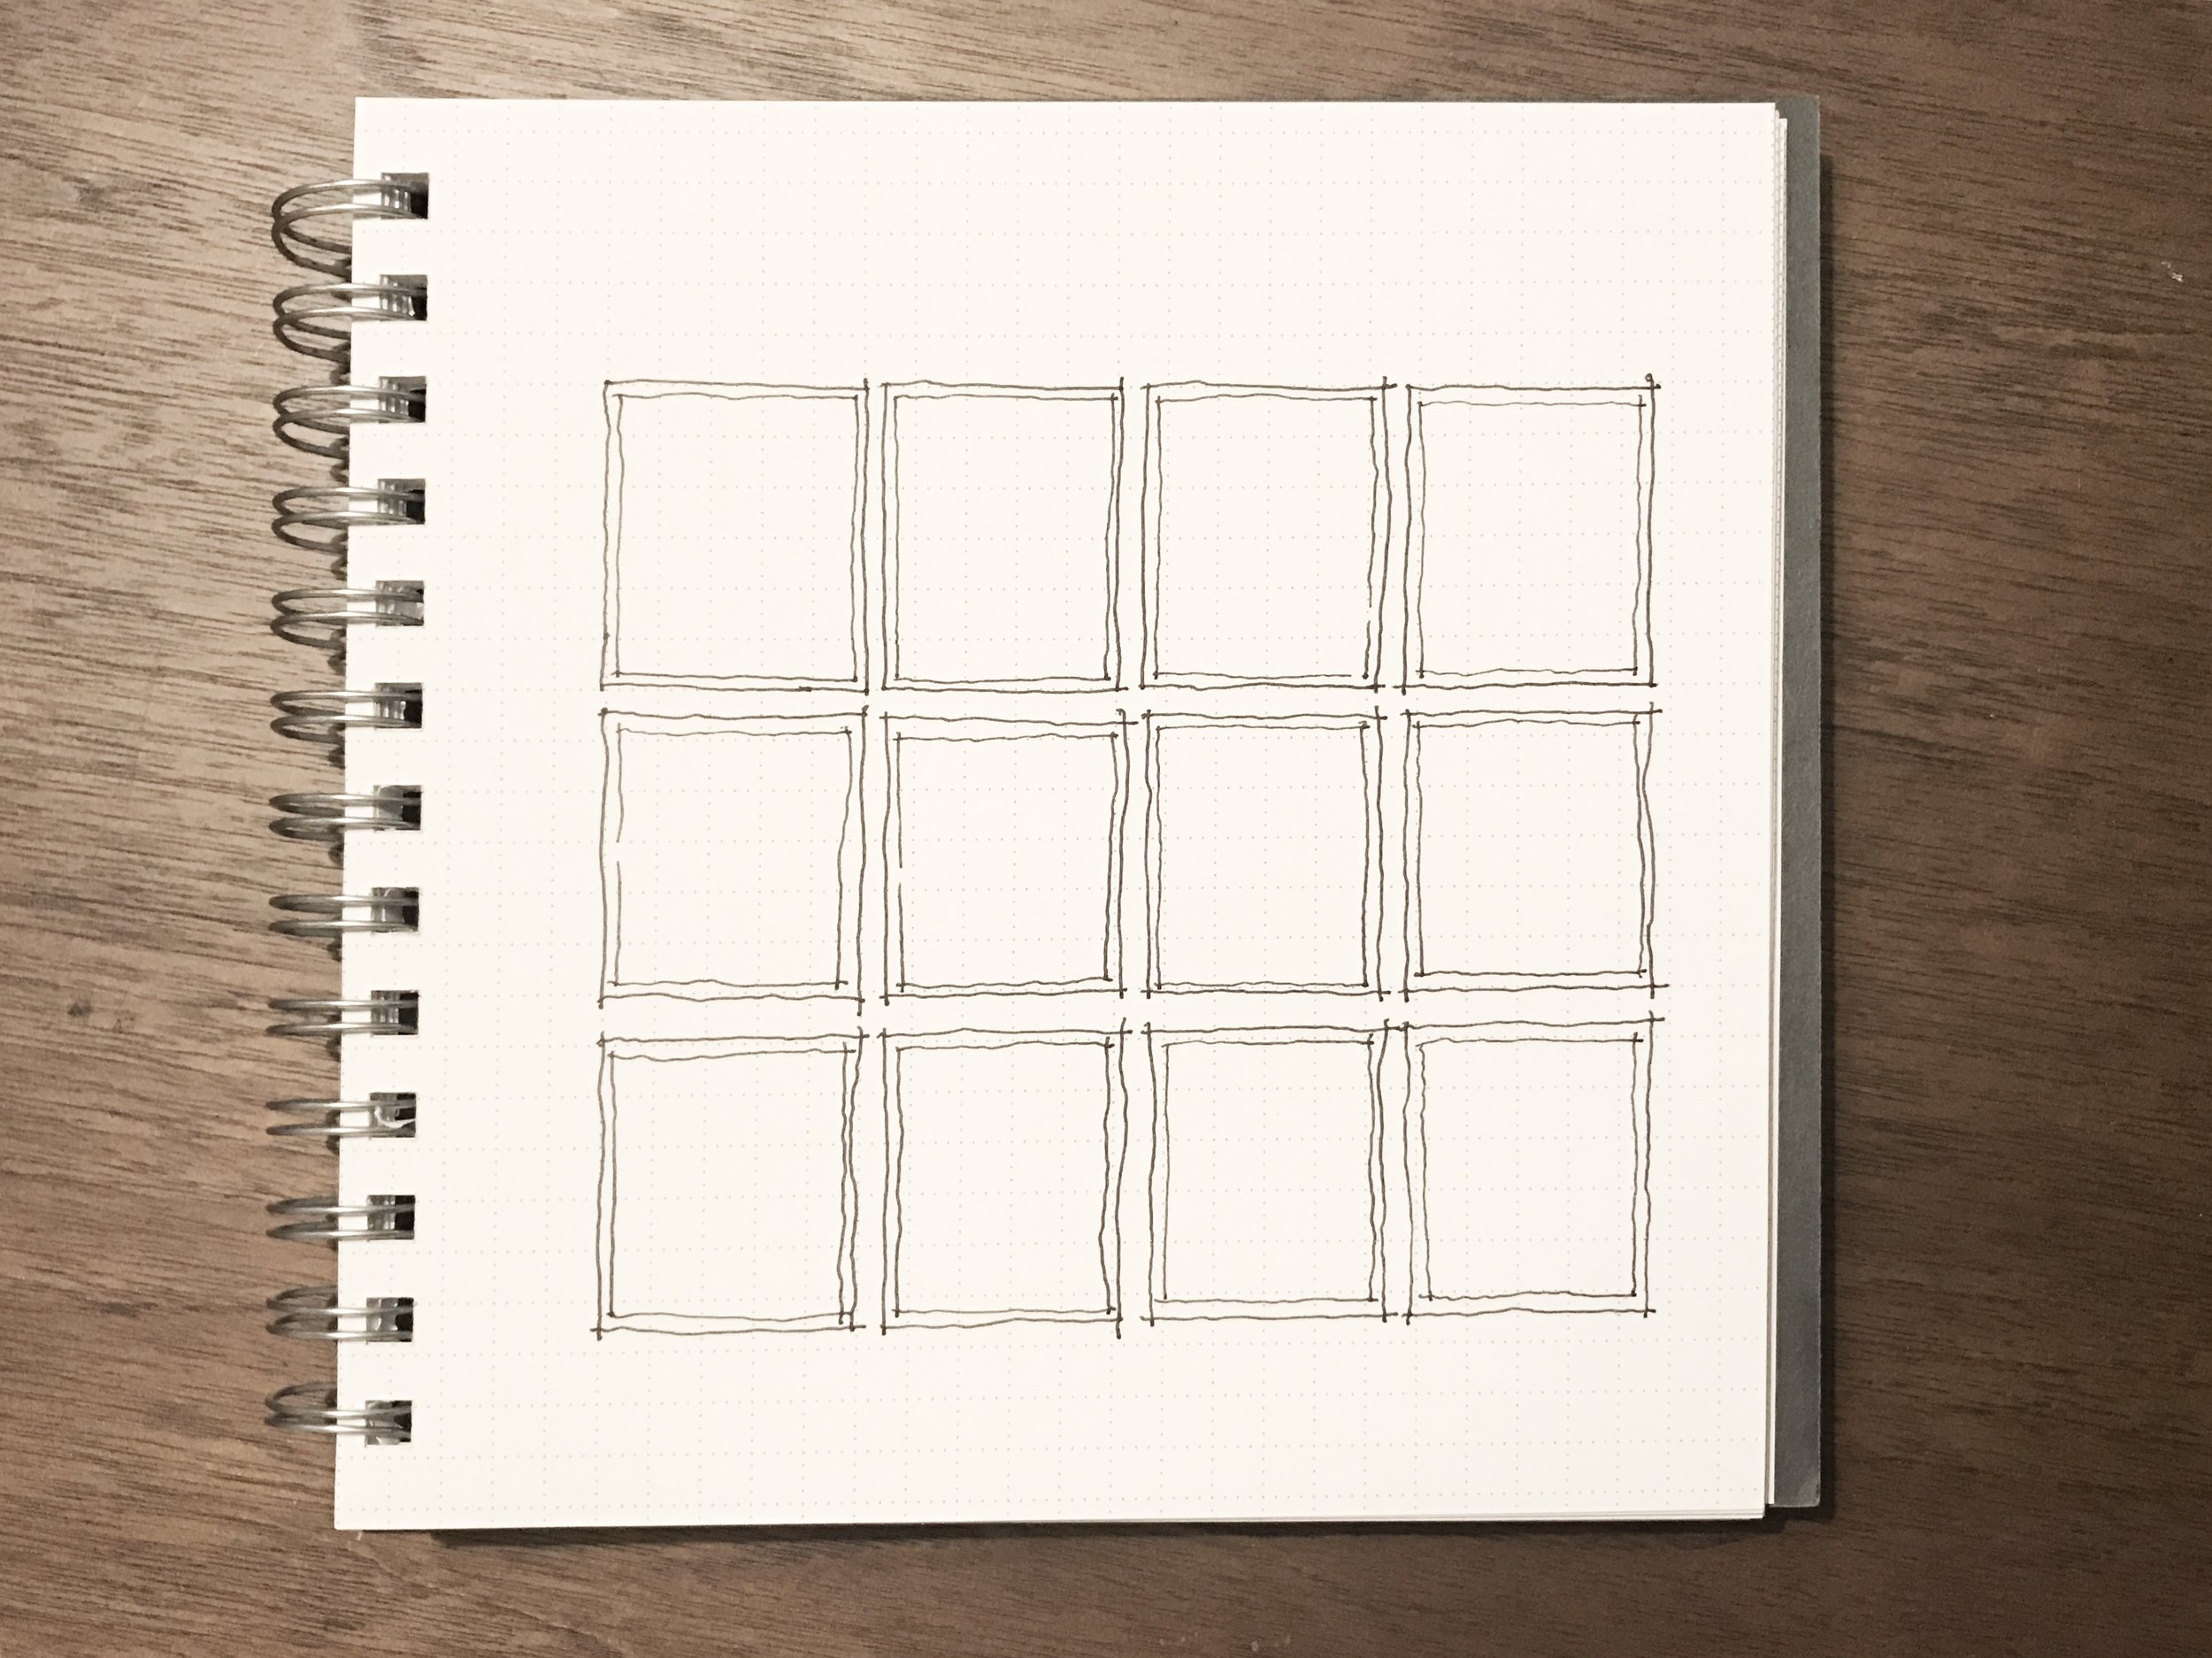
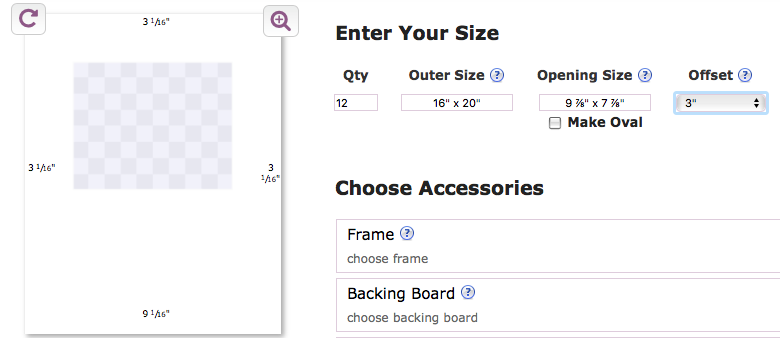
Then came the tricky part. I had to figure out the spacing of each of my stiles so that they were perfectly even and created 5 recessed panels. Rather than frogging around with the math, I used this website where I input the total length of the recess (67"), the length of each style (4"), how many stiles I had (4), and that there were no stiles at the top or bottom of my recess. 

IMG_6289.jpg

This gave me the exact distance for each stile's centerline which I marked on both verticle sides of the door front and back.

Screen Shot 2018-06-28 at 12.13.16 PM.png

I then measured the center line on both ends of each of my stiles and lined them up with the marks I made on my door.

IMG_6286.jpg
IMG_6287.jpg

I double checked the spacing for good measure before gluing them down. Once everything looked good I used liquid nails and a mallet to hammer everything into place. 

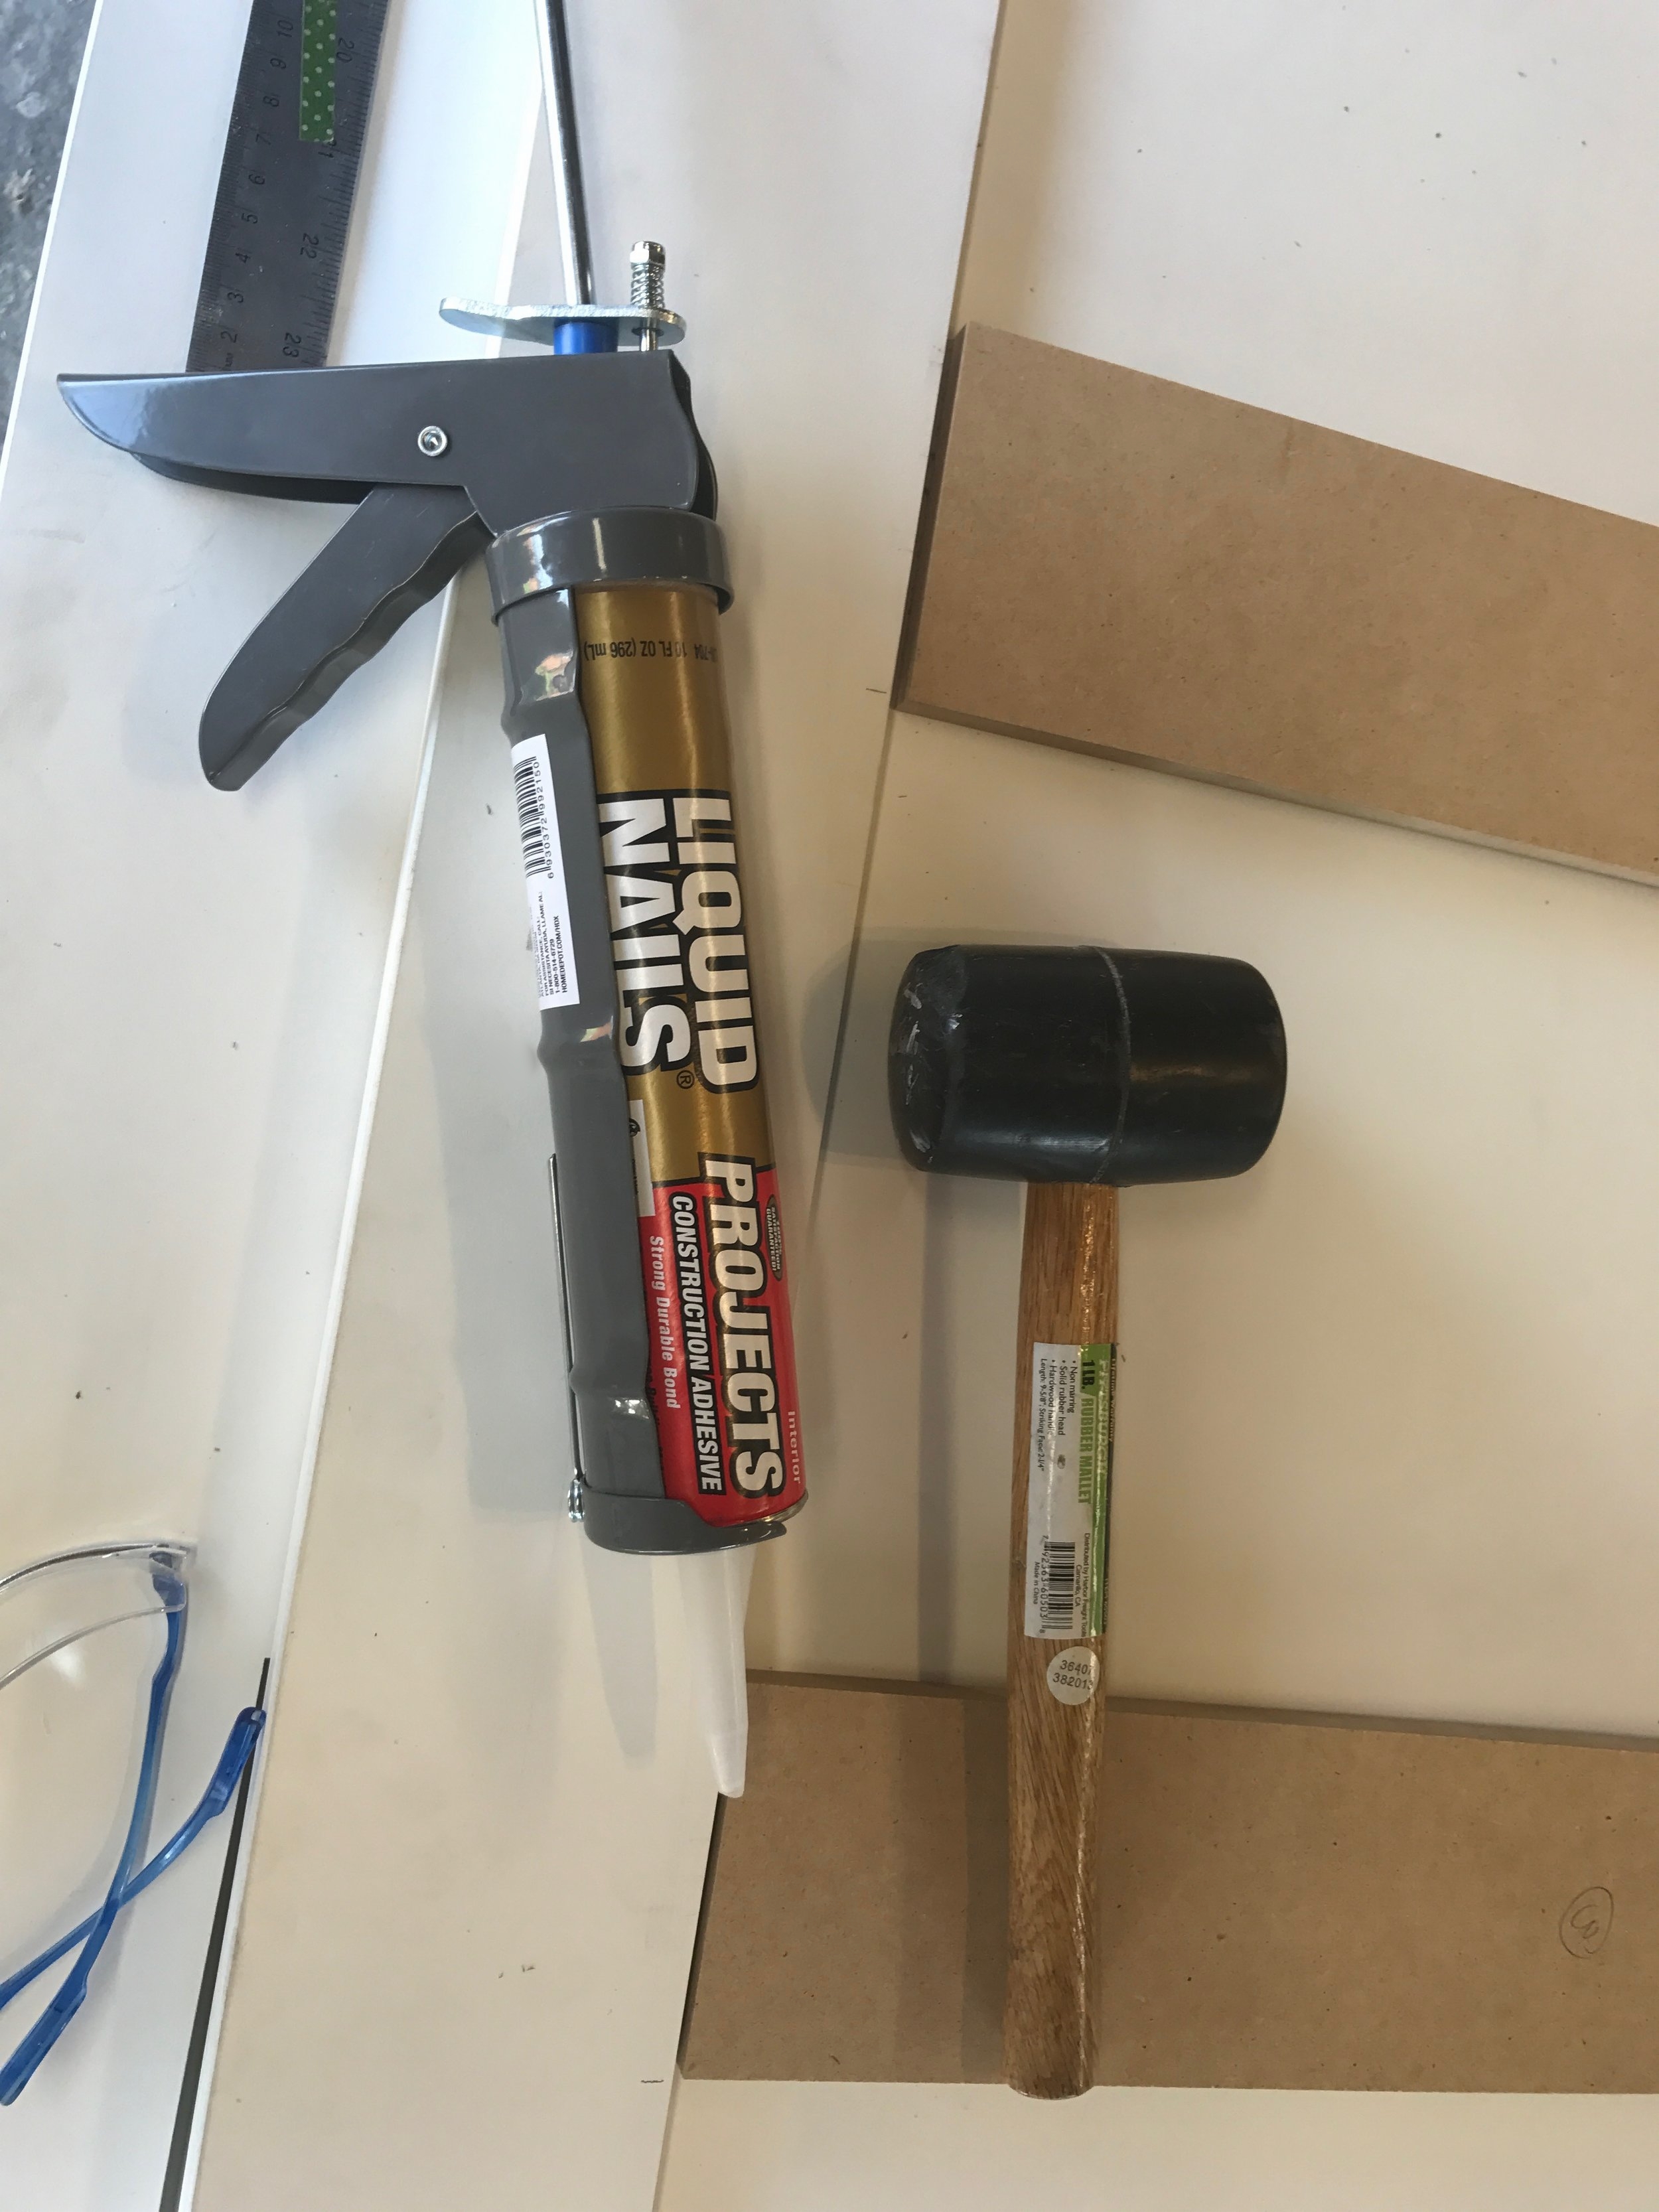
Then I used our collection of paint cans to keep everything in place and prevent the MDF from lifting or bowing while the liquid nails cured.

IMG_6294.jpg

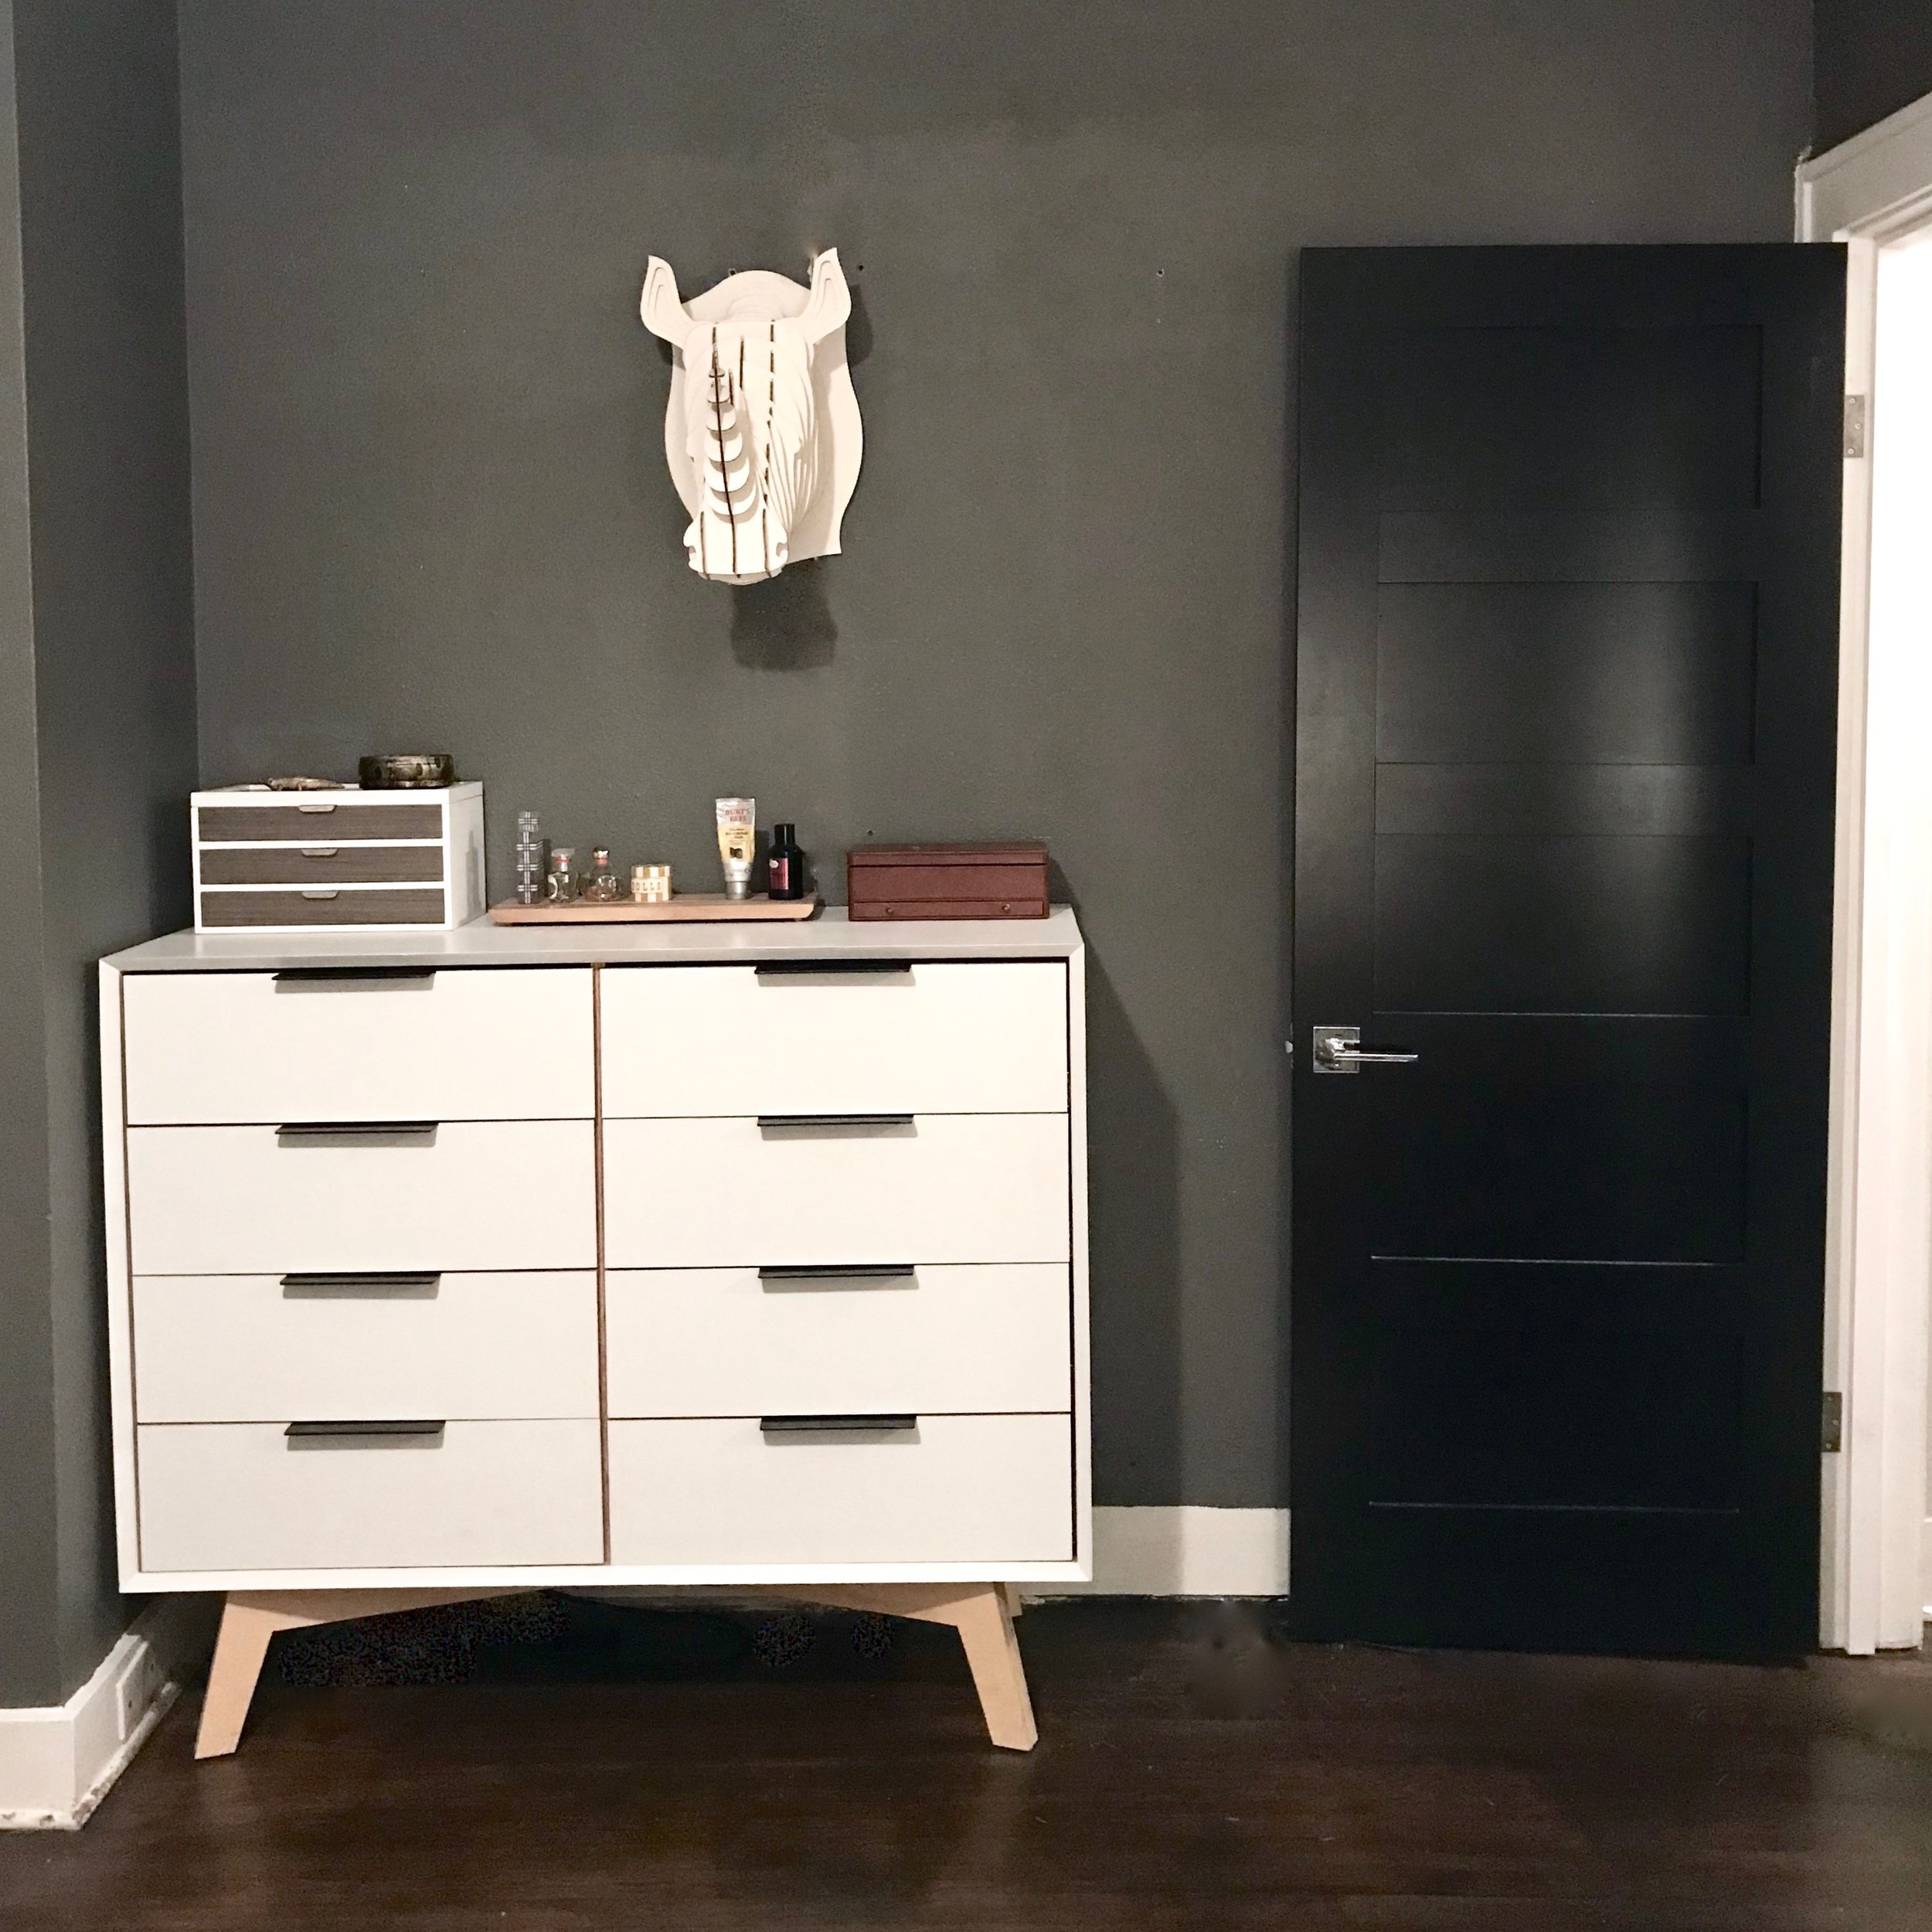
Once all of my stiles were glued down on both sides of all of my doors, I filled in any blemishes with wood filler and then sanded the doors to prep them for paint. We love the look of black doors against our crisp white trim and light grey walls, so I went with my all time favorite black, Sherwin Williams Iron Ore. 

IMG_6337.jpg

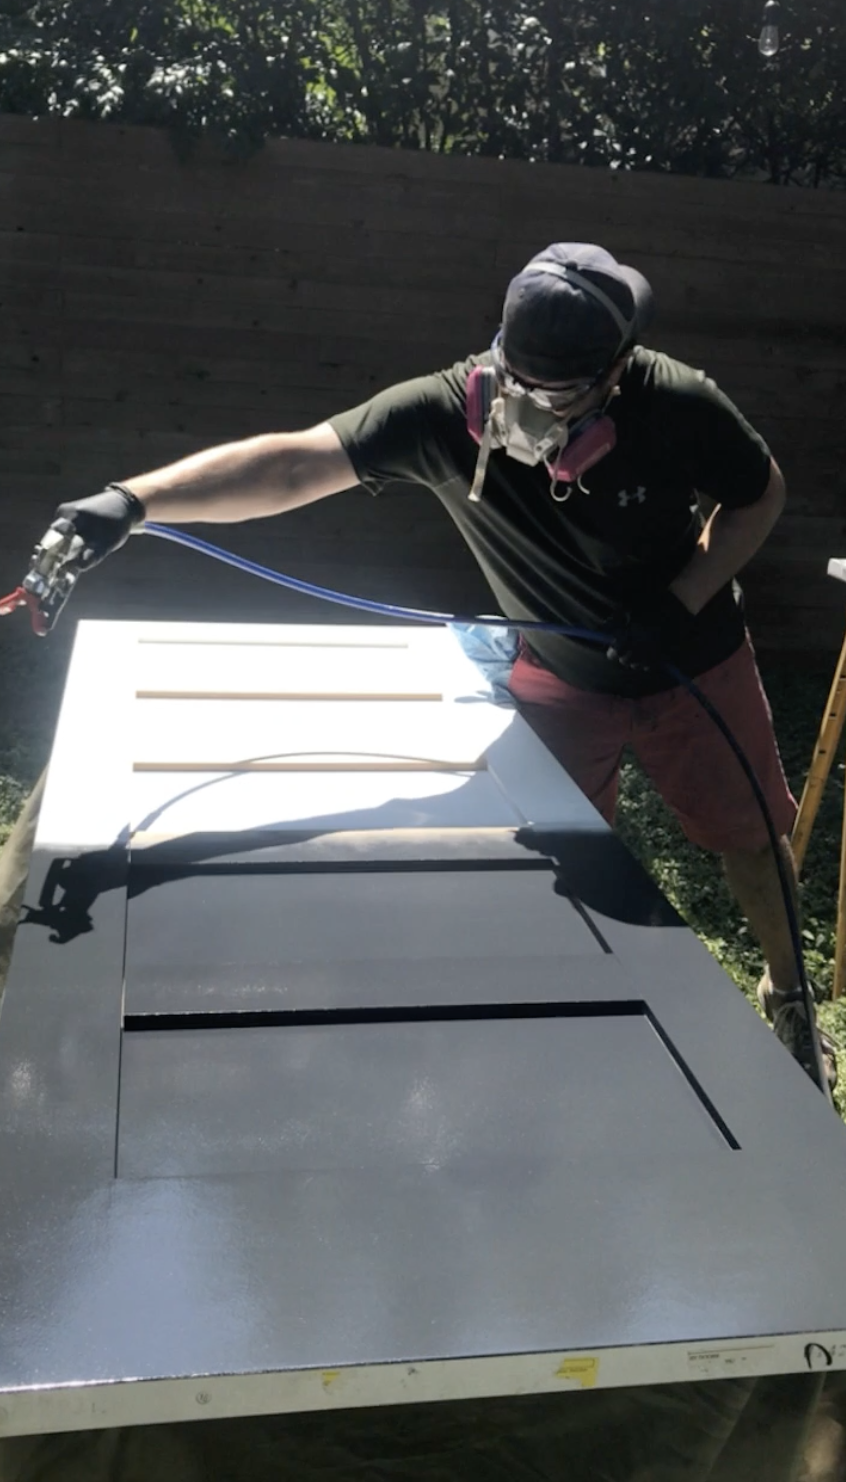
Derek sprayed all of the doors for me because let's face it, I was pregnant at the time. In between each coat of paint I wet sanded the doors to create a nice smooth finish. 

While the doors were drying with their final coat of paint, we went ahead and prepped all of the door hardware. All of the original solid core doors in our house (bathroom, guest bedroom) had the original 1930 butterfly hinges, but were caked in decades of paint. We brought these back to their original patina (I'll do a whole blog post on this method). For the doors that either didn't have hinges (accordion) or had boring builder hinges, we replaced them with matching half mortise hinges that we picked up from our local architectural salvage store for about $20 a hinge. This way everything would look cohesive and true to the original character of our home. For the door handles, we originally thought about finding historic knobs true to the era of our home but in the end decided against it. First of all, they are about $100 a knob and its hard to find enough that match. Second of all, we want certain elements of our home to remain in the craftsman style, while other elements are more modern. I just love riding that line of balance. We picked up several of these Kwikset Halifax Square Door Levers in polished chrome, which bring these classic doors into the 21st century. 

Screen Shot 2018-06-28 at 12.38.21 PM.png
IMG_9576.jpg
IMG_9581.jpg

And where is the door to the kitchen for our midnight snacks? That's another post for another time. 

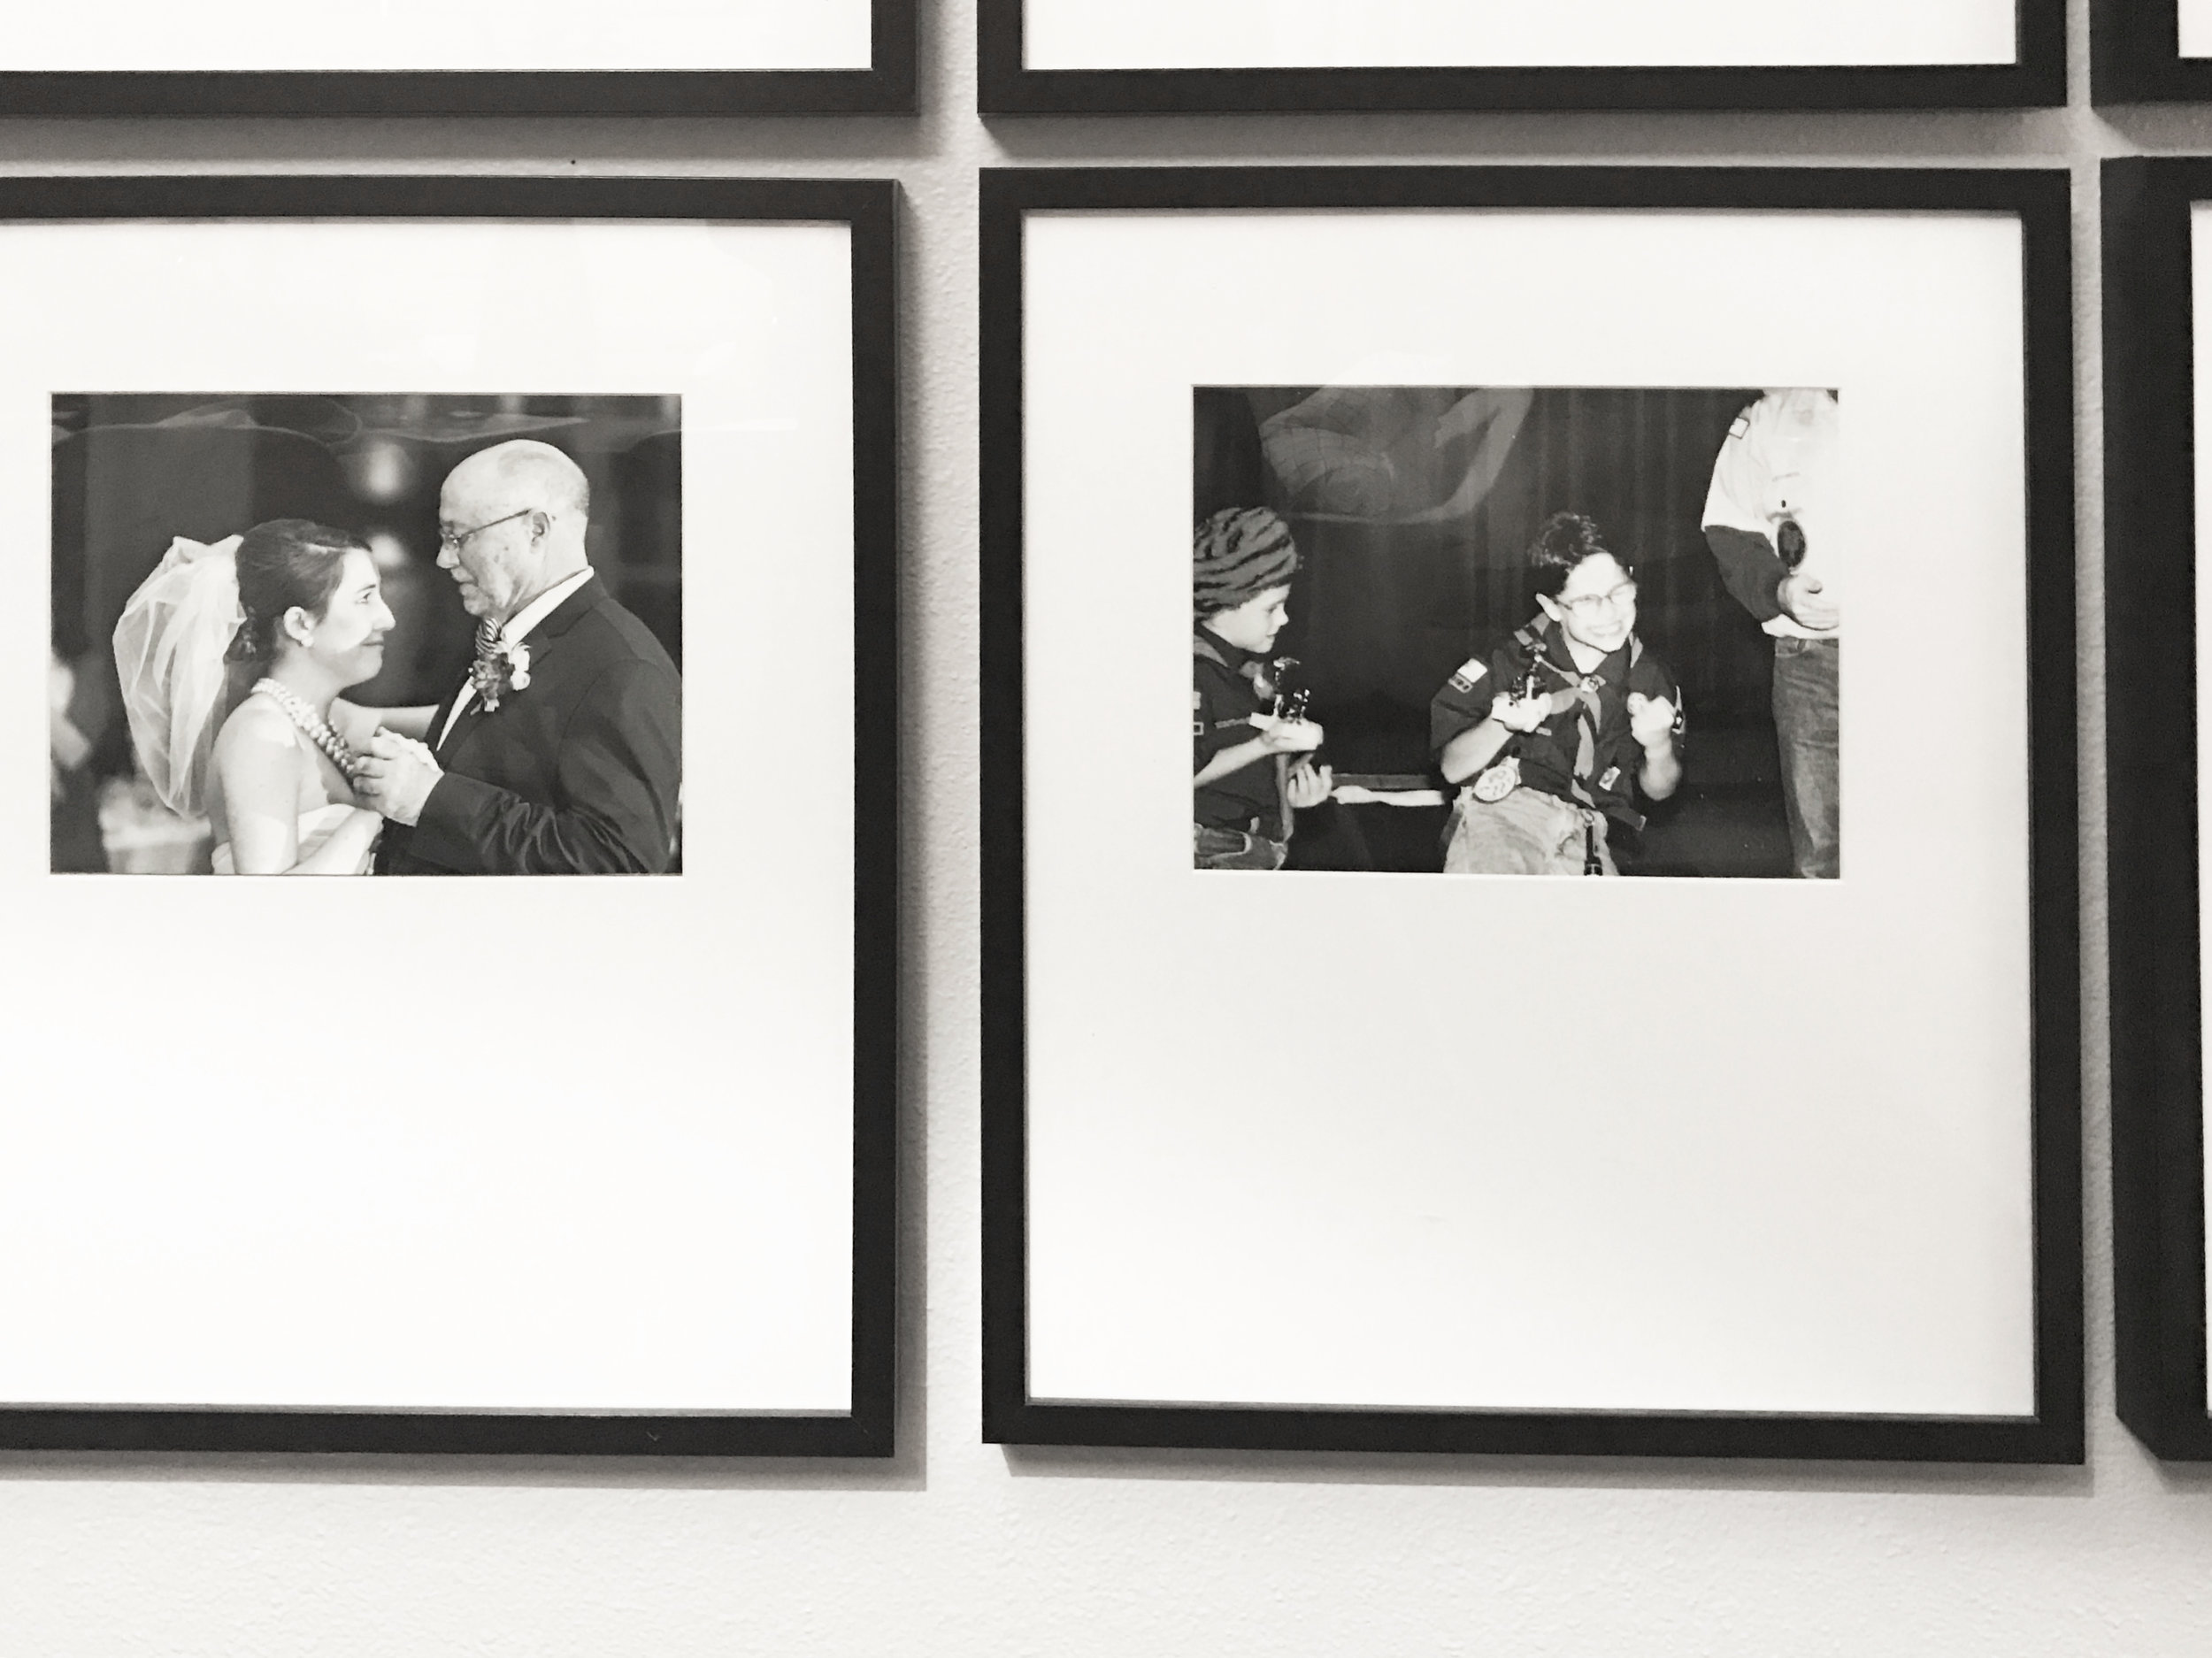
So funny story. After completing this project, now Home Depot sells pre-made 5 panel doors for about $99 a pop that are right off the shelf, no more custom orders. Whatever Home Depot we were tired of waiting on you to get in the shaker door game. We still saved a ton of money though going this route because our Habitat doors were only about $30 a piece. And what a difference they make!  Let's look at a little before and after just to really sell it. 

IMG_9576.jpg

Yes that is Derek's Architecture Lego collection. He is very proud.

Sleepless in San Antonio

MotherhoodCatharine KlepacComment
IMG_0771.jpg

I can't believe I'm actually saying this, but after 10 weeks worth of sleep deprived nights. Olivia is finally sleeping in her crib. And she's not just sleeping willy nilly. She's sleeping through the night. That's right. How you ask? Well after sending out a plea of desperation on Insta Stories. My friend Lauren from college recommended the book Healthy Sleep Habits, Happy Child. I immediately ordered it on Amazon and devoured it.

You may be thinking, well I have a two year old who won't sleep. His methods can work as early as 6 weeks old all the way through adolescence. It's never too late to practice good sleep habits. I for one am a terrible sleeper while Derek can literally sleep anywhere, so instilling these habits in your child will help them into adulthood. 

IMG_1711.jpg

Now in this book there are several methods for getting your child to sleep through the night. The most drastic of which is very controversial among parents, but has the quickest results. And being at about our wits end, I was ready to go to the extreme with our baby girl. What I'm about to tell you may make you cringe, but before you judge us for being terrible heartless parents. I'll be the first to say that it worked, and she was sleeping through the night in her crib without a peep within five days. When I say "through the night" I mean that there is still one nighttime feeding. However, by night three she was sleeping for 8 hours straight before her night feeding. And now every couple of days she'll go 11 hours before waking up to eat.

Here's what we did.

Understanding Sleep Queues

DSC_0181.jpg

This book stresses that parents are often selfish when it comes to keeping their babies awake. Either from being away at work and wanting to soak up those precious moments when you get home, or being too distracted with the TV, phone, other children, etc. to recognize that your baby is giving you visual signs that they are tired. These queues are your typical sleepy signals: yawning, rubbing eyes, staring off into space, sighing, sucking on hands, etc. Once you notice one or a combination of these signals, it's time to stop what you're doing and start your bedtime routine. You want to ride this wave before their second wind comes along and they are overtired (crying, fussy, unable to soothe, etc.) It's kind of like how you want to feed your baby before they are hungry to avoid the meltdown. Once you've mastered this you will easily know when your baby is ready to go to sleep whether its bedtime or nap time. You should rely on your baby's sleep queues not a clock.

Establish an Early Bedtime Routine (and Be Consistent)

We aim for around 6:00pm. I know this is very hard for working parents, but what is even harder is a baby that cries all night. Obviously it's still super light out this time of year, so we installed these blackout shades that we pull down during naps and bedtime. Your baby will naturally learn their circadian rhythm and start to differentiate day from night (or naps from bedtime). 

Our daily bedtime routine goes something like this:

5:00ish - turn the lights down low and close the shades

5:00 - "last call" feeding

5:30 - bathtime

5:45 - fresh diaper, clean onesie, sleep swaddle (more on this later)

6:00ish - lights off, sound machine on, start soothing, nighty night

We practice this method every single night regardless of where we are. Babies love routines. However, sometimes we have an event where we have to stay out past her bedtime. The book stresses that pushing back her bedtime will cause serious havoc on their sleep that night and the next day. So far (knock on wood) we haven't found this to be the case, but we also don't abuse this. If we do stay out "late" we will get home by 8:00pm at the absolute latest and start the bedtime routine.   

Teach Your Baby to Self Soothe

One of the 1,000 things I never knew about babies, until reading this book, is that they have to be taught how to sleep. When they are in the womb they are naturally rocked to sleep all day when you walk around. All warm and comfy. However, on the outside they need complete womb simulation in order to sleep. So after the first sleepless night (when she was about 5 days old) we made the mistake of bending over backwards to do everything we could to recreate this womb-like environment for her. Which resorted to her being swaddled in Derek's arms as he rocked her to sleep on the sofa. all. night. long.  We made him a pillow nest that was encouraged by our pediatrician for "safe sleeping", and every night he would hold her while she sucked on his finger listening to white noise. Snug as a bug in a freaking rug. 

IMG_1290.jpg

The book explains that you want to soothe your baby to a point of a "sleepy but awake state". So many parents put their babies down asleep and then scoop them back up the second they start crying (guilty). However, if you put your baby down asleep they will never learn the skill of self soothing. Therefore when they wake they will cry and cry until someone soothes them. What is self soothing? All babies differ, but in our case Olivia likes to suck on her little fists and rub her cheeks until she falls asleep.

Enter the most amazing baby product ever invented.

The Magic Sleep Swaddle to End All Sleep Swaddles

IMG_1982.jpg

Disclaimer: this is not sponsored by Love to Dream, I really am just honestly obsessed with this product. 

So swaddling is fine and dandy if you have a good sleeper (or if your baby isn't a swaddle busting ninja). However, if you're like the rest of us your baby will never learn to self soothe if their hands are pinned down at their sides. So you can either swaddle them with their hand up by their mouth, or just get one of these. I've never met a baby product that has worked so well so quickly. This guy does what it says it will do to the point where Olivia will immediately start sucking on her hands (we call them flippers) the second I start putting it on her. We implemented this on the third night which is when she slept for a solid 8 hours without waking. Before that the longest she would sleep on her own was 3 or 4 hours tops.

Full Extinction

Okay enough stalling. As I said earlier, the book provides several different methods for getting your baby to sleep through the night after you have put them down sleepy but awake. And as I mentioned before we went with the harshest method with the quickest results. 

Okay here we go. Are you sitting down? 

After you put your baby down sleepy but awake you leave the room, close the door, and don't go back into the room until they wake for the middle of the night feeding. Yep. You let them cry it out. How long? For as long as it takes. This was worse than childbirth. Derek and I literally had to stop one another from caving and rescuing her. We didn't watch the baby monitor, we put a movie on and pretended to watch it. But as the book states, you are not hurting your baby by letting them cry. You are hurting them by depriving them of sleep. 

Here are our results:

Day 1

Crying: 70 min (I know. Bare with me.)

Sleep: 3hrs - feed - 3hrs - feed - 2hrs

Day 2

Crying: 60 min

Sleep: 4hrs - feed - 4hrs

Day 3

Crying: 32 min

Sleep: 8hrs - feed - 3hrs

Day 4

Crying: 20 min

Sleep: 8hrs - feed - 4hrs

Day 5

Crying: 10 min

Sleep: 9hrs - feed - 3hrs

Day 6

Crying: 15 min

Sleep: 6hrs - feed - 5hrs

Day 7

Crying: 5 min

Sleep: 11hrs

So yeah. The first two nights are rough. But as you can see from our results there is a light at the end of the tunnel. And now when we look at the monitor we just see our little girl sleeping soundly in her sleep swaddle. In her favorite position. Her head jammed up against the crib railing. Go figure.

IMG_1878.jpg

Night Feeding

For her night feedings there is minimal stimulation. This is not social hour, it's a "business feeding". When Olivia wakes I turn on the hall light, go into her room leaving it dark. I turn down the sound machine to it's lowest volume. I pick her up, kiss her cheek, change her diaper, zip her back into her sleep swaddle, and feed her in almost darkness with just the hall light creeping in. Afterwards I turn the sound machine back up, I burp her, kiss her again, lay her back down, and close the door. Even from the first night of training she immediately fell back to sleep after her night feeding. 

Regular Napping with Limited Wakefullness

Another thing I didn't know is that babies require A TON of sleep. It varies by age, but even at 3 months we're talking about 16-17 hours a day. So with her average of about 12 hours of nighttime sleep, this still leaves 4 hours of sleep that has to happen during the day. At the beginning she would automatically sleep during the day with little to no soothing. But now with there being so much to see and do, I have to soothe her pretty heavily before each nap. 

Here is our typical schedule:

5:00 am - wake / change / business feeing (pretend it's still nighttime)

5:30 am - early morning nap (I usually sleep during this)

8:30 am - wake / change / business feeding

9:00 am - mid morning nap

9:30 am - wake / change / greet the day / feed / activity

11:00 am - early afternoon nap

12:30 pm - wake / change / feed / activity

1:45 pm - mid afternoon nap

2:45 pm - wake / change / feed / activity

4:00 pm - late afternoon nap (optional)

4:45 pm - wake / change / feed / bath

6:00 pm - bedtime 

She tends to sleep for about 40min to an hour during each nap, so at the end of the day we hit that 16-17 hour mark of sleep, which is the goal. At first I had her in my arms for all of her naps other than the early morning nap. But as each week has gone by I've slowly transitioned each nap to the crib and now she's 100% sleeping in the crib.

Have Confidence That a Well Rested Baby is a Healthier Happier Baby

IMG_1872.jpg

After the second day of training we immediately saw that we had a completely different baby. Rather than screaming bloody murder when she awoke (even in her daddy's arms), she quietly chatters to herself until you walk into her room, and then gives you THE biggest smile. She is happy and alert all day, when before we were terrified to even take a phone call, go out in public, or have company over in fear that she was just going to start screaming. To this day she never cries after waking up. She barely cries when we put her down, and if she does it's usually because she's over tired and we missed her sleep queues. I'm not saying this is a fool proof method, but after seeing results almost immediately, I felt selfish not sharing our experience.

Note: I am not a sleep expert, you should definitely read this book before attempting anything especially if you have an overly fussy / colicky baby. Also, a lot of people (guilty again) resort to the stroller, car rides, etc. for sleeping. Which is fine and dandy for short naps. But as the book states this is not quality sleep and shouldn't be a crutch. You won't see real change until your baby get's solid and sound sleep.

Has anyone tried a similar method? What worked for you?

How To: Refresh Your Hazy Tile

DIYCatharine KlepacComment

So you probably remember me bellyaching about how poorly our kitchen tile was installed when we first moved into our house. AKA lessons learned. So here is a little knowledge bomb about how tile and sealer work according to my manufacturer's rep. When tile is sealed the installer is supposed to wipe away any sealer that gets on the tile because it will literally act like a magnet for dirt, and you will NEVER be able to fully clean it. I mean it will be clean, but it will look filthy. So then what's the point amiright?

That being said, our sealer had been aplied with a mop (and several coats) that not only sat on the tile, but also trapped any grout haze, dirt, footprints (I'm not even joking), and debris that wasn't properly cleaned unerneath the layers of sealer. So in our situation it was a losing battle because 1. the floor actually was filthy (yet preserved under layers of sealer) and 2. it was then coated in sealer which was an unstoppable dirt magnet. 

This is what it looked like fresh after installation and sealer. Notice the grey splotches and general haziness. I know I know its not that bad, but I mean when you want white tile you should have white tile. Oh and this was just the beginning.

tile floor before.jpg

After telling my grout rep about our situation he gave us some crazy intense chemical strippers and cleaners which we still haven't tried because the back label is filled with terrifying warnings. Highly flammable, skin irritant, eye irritant, must wear gloves, googles, and a respirator. I'm like whoa buddy this is a scary project. AND we were going to be on our hands and knees with a tiny toothbrush scrubbing each tile. Fun right?

So we kept putting it off, and kept apologizing to guests for how filthy our floor looked assuring them it actually was clean. This went on for two years. You think we're exaggerating like when you go to someone's house and there is a throw blanket haphazardly tossed on their sofa and they are all "oh pardon our mess" and you're all "whatever this place is immaculate", but this is how much dirt had accumulated over these 2 years.

tile before.jpg

I'll pause while you go and throw up. This tile was WHITE when we bought it. AND this photo was taken after cleaning and steam mopping. 

A few weeks ago I saw an Insta Story where they used vinegar and water to strip sealer and remove grout haze and I was like what.

You guys. This method is no joke.

AND you can breathe it and touch it and eat it (if you want). It's that natural.

File_000.jpeg

Supplies:

  • Spray bottle of Vinegar + Water mix (1 part vinegar 3 parts water)
  • All purpose cleaner (we barely had to use this)
  • Scotch Brite pads
  • Paper towels or rags
  • Orbital sander

The overall process is pretty simple. You just vacuum and spot clean your floors using an all purpose cleaner to remove any loose dirt and debris. Then you generously spray your floors with the vinegar water mix working in small 2'x2' areas. Place your Scotch Brite pad on your orbital sander and work work around your freshly sprayed area and you will instantly see the dirt and stripper come up like magic. Wipe away the dirty water and voila! sparkling clean floors that look just like they did when you first laid eyes on them. You may have to touch up a few areas once you wipe away the dirty water and can see if there are any stubborn spots that need a little more scrubbing. 

We (Derek) continued this process in rows all around the room and overall it took about an hour. Not too shabby. AND no masks or ventilation were required. And the house just smelled like a salad bar for a while. 

File_000.jpeg
File_002.jpeg
File_006.jpeg
File_004.png

I still can't believe what a difference this method made. You can also do this on the walls or anywhere else you have tile that is either covered in haze or just looking dull in general. I can't wait to try it on our bathroom. Even the texture of the stripped tile feels totally different. 

You're probably wondering how it has been holding up, and I'm here to tell you that we've been living in a construction zone with people coming in with gross shoes and debris falling from walls and they still look brand new sparkly white. Scouts honor!

How To: Modern Gallery Wall

DIYCatharine KlepacComment

After receiving several questions and sweet comments about our gallery wall, I figured that I should share a little tutorial on how my favorite gallery wall to date, came to be.

Our dining room and living room share a long wall that needed some sort of division. I wanted to break up each room with my art selections, while still allowing for the two rooms to look cohesive. I knew that I wanted a large single piece over the sofa, which meant that I would need something a little different (but still large in scale) to balance this out on the other end of the wall. The solution: a gallery wall. I had toyed with a couple of different options before landing on what it is now.

My friend Lauren over at Copper+Walnut had posted her freshly hung gallery wall on Instagram, and I knew that I wanted something similar for our dining room. I had about a 6 foot wide space to work with, so I sketched out a few ideas, and ended up landing on this:

IMG_6362.JPG

I ran over to Ikea while visiting Derek's parents and picked up twelve 16" x 20" Ribba frames in black. Which was a feat in itself because that Ikea (Houston) doesn't let you take your shopping cart to your car so you have to carry everything in your blue bags. And 12 large Ribba frames was a bit of a workout. 

You should know that although Ikea markets these frames as a true 16"x20", they are actually 15-3/4" x 19-3/4". Because. Sweden. Which I didn't realize at the time so I had a bit of trimming to do, but we'll get to that later.

I decided to print my photos as 8x10's which let my frames be more mat heavy and created a bit of a minimalist approach to my gallery wall. This allowed me to highlight each photo individually in a smaller format, rather than keeping them large and busy. The Ribba frames come standard with a 11" x 15" mat opening so I ordered custom mats from Matboard & More

I went through their zillions of options (seriously, you can get any type of mat there) and set the overall dimension to 16"x20" (see warning above) and the opening to 7-7/8" x 9-7/8". I did this so that the mat slightly covered all sides of the 8x10 photos by 1/8". I could have made this dimension a little larger, but I wanted to see as much of the photo as possible. While my frames would be hung vertically, I wanted each framed photo to have a bit of a museum quality so I also chose to have each opening placed horizontally on a vertical mat and offset the opening to the upper 1/3 of the overall mat (also known as Top Center on their website).

They let you set the dimensions as precise as 1/8" so really the options are endless. Ideally I should have ordered my outer size in 15-3/4" x 19-3/4" and I wouldn't have had to trim off 1/8" off each side of my mats when they arrived. Which if you've ever cut mats, it's pretty tough. 12 mats x 4 sides = 48 total cuts. #math 

When it came time to hang all of my frames I took the overall dimension which was 64" (16" wide frames x 4 frames) and then knew I was going to space everything 1" apart, so I added 3" to that width as there would be 3 spaces between the 4 columns of frames. Then I centered the entire dimension within the space and lined the top row up with the door frame to create a nice clean line visually, and worked my way down the wall. I made templates for each frame using the faux photo included with the frames because it was the exact size of my frames (minus an 1/2" on each side where the frame would be) and with a little bit of math, I placed each template so that it would end up having each frame 1" apart between each column and row of frames. I marked on each template where the hanging wire sat so that I knew exactly where to place each nail without having to make a bunch of random holes in the wall.

With each frame at $9.99 each, and the custom mats at $4.00 each the overall cost for this quick and easy project was about $160. It's such a fun conversation piece when we have guests over, especially with the photos from when we were little. Hello cowlick (this is why I can't have bangs). We choose photos that varied in composition, and I arranged them so that there weren't a bunch with similar scales right next to each other, or three Geoffreys in a row. This really helped the overall gallery feel balanced. 

My parents loved our gallery wall so much that they ended up making a similar one for their front entry and had the mats ordered with the right outer size so their gallery wall took half the time.